
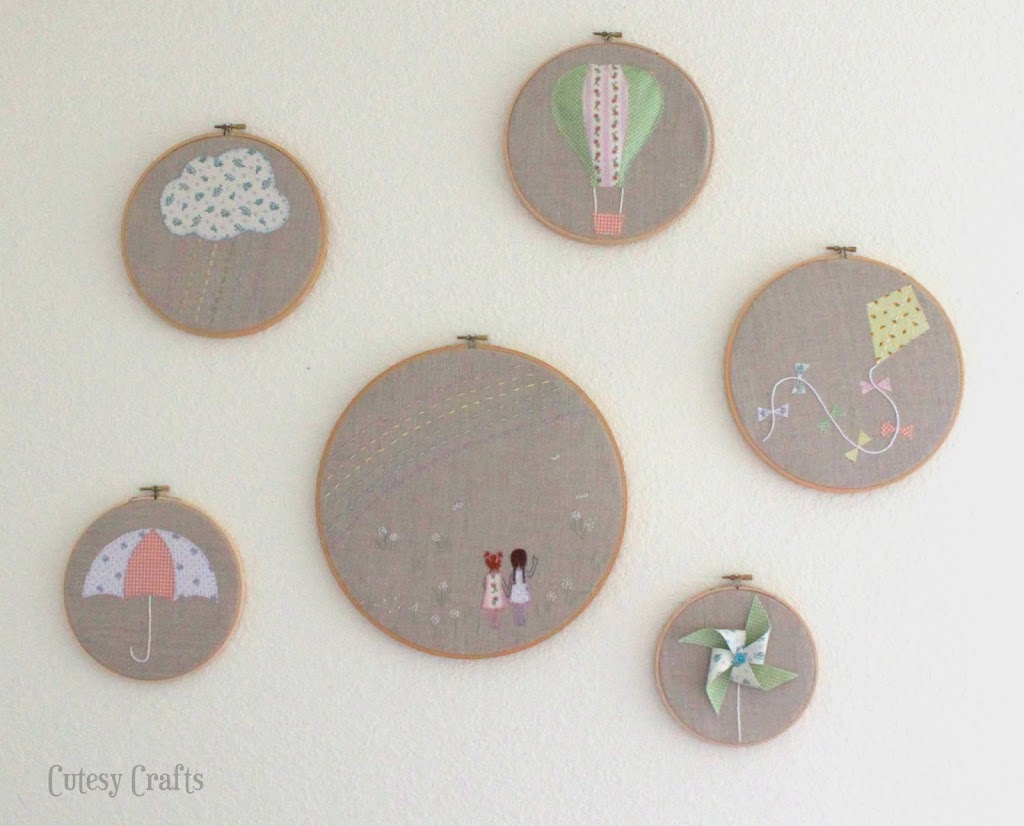
Free Embroidery Hoop Art Patterns
I’ve always loved seeing other people’s hand embroidery. It’s like art with a needle. I knew that I wanted to create something special to go on the wall of my little girls’ room, so I drew some scenes to make some embroidery hoop art patterns. Everything was hand-stitched by me onto 100% linen fabric. I absolutely love how they turned out, and I’m planning a whole room themed around them. Click here and here to see some other elements that I made for the room. If you need help with any of the stitches, I have video guides on my embroidery stitches guide page.
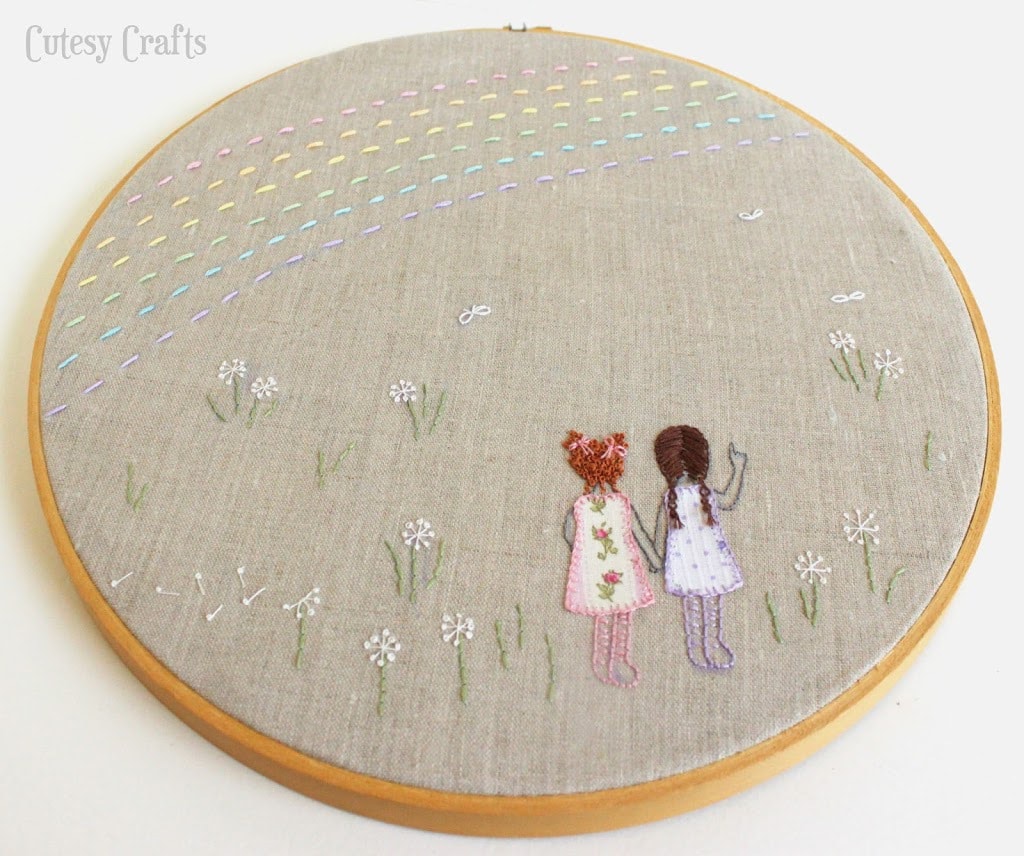
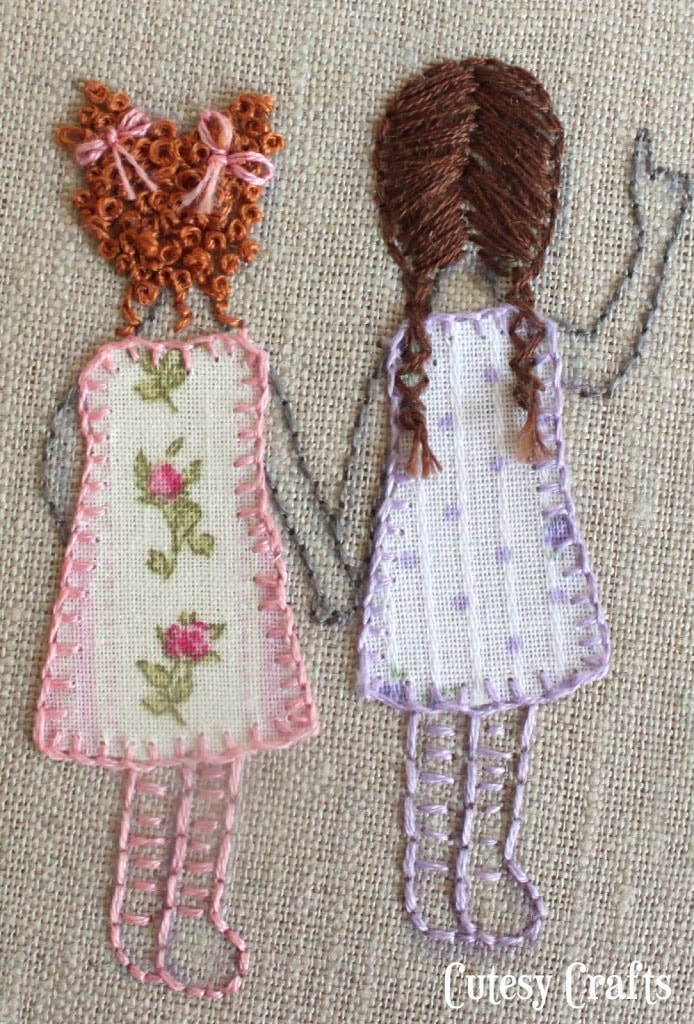
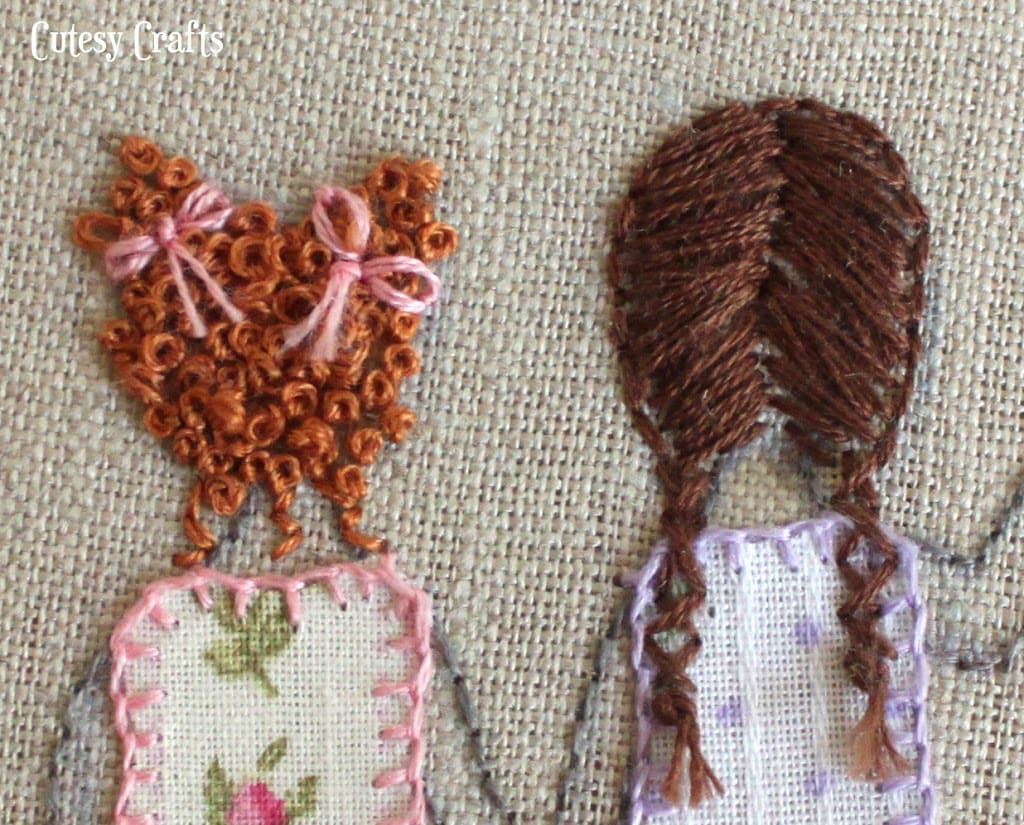
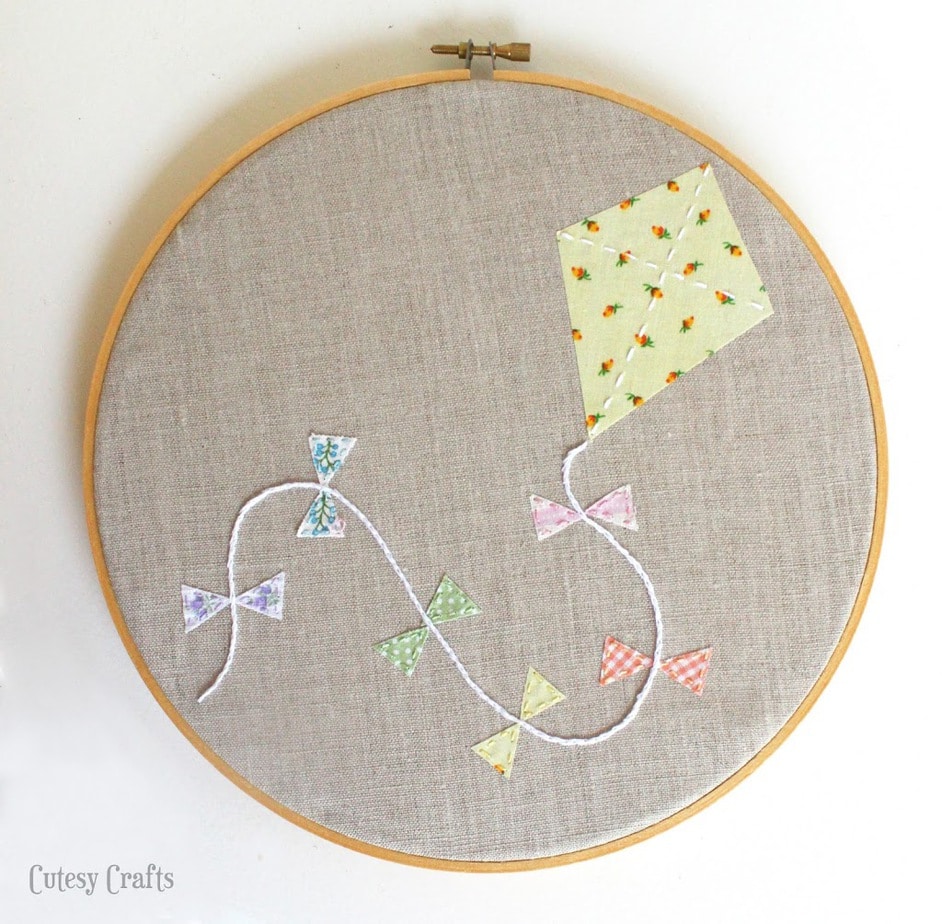
The best part about hand embroidery is always the little details! French knots make great curls, and for the braids, I used a cross stitch. The rainbow is a large running stitch and more french knots for the dandelions. Do you see the lazy daisy stitched bows and the ends of the braids? Details! 🙂 The two girls are supposed to represent my two daughters. Leah’s hair isn’t quite that red or that curly, but it still works.
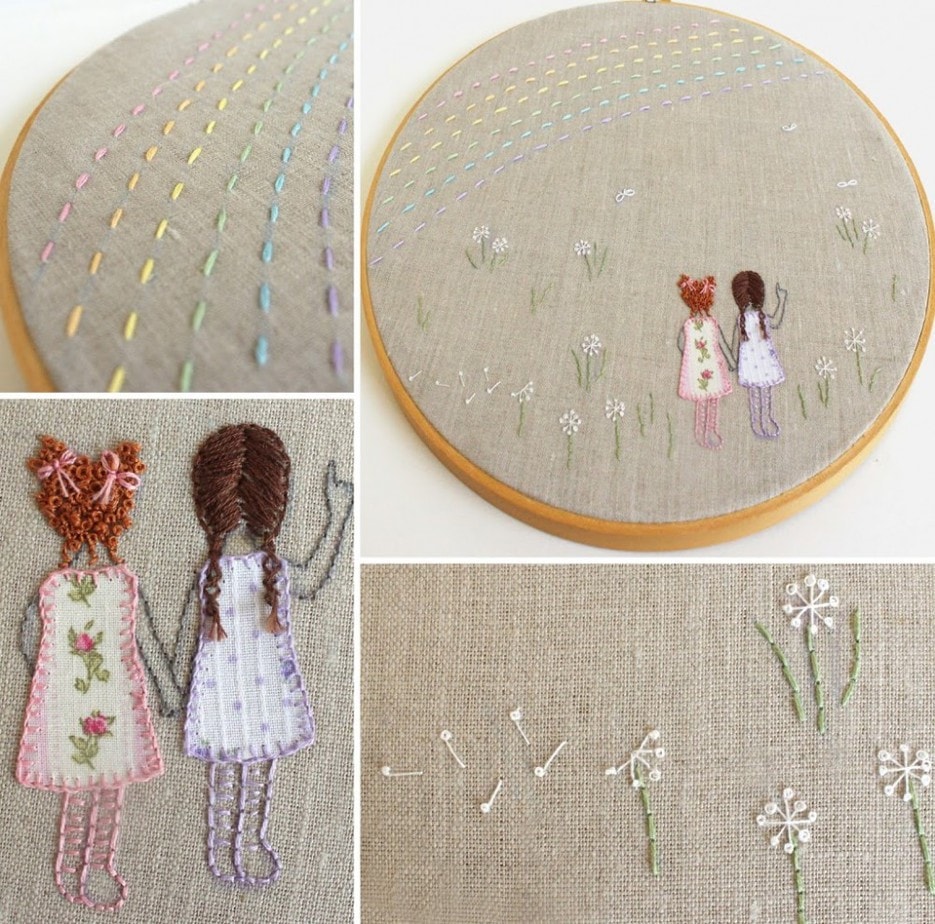
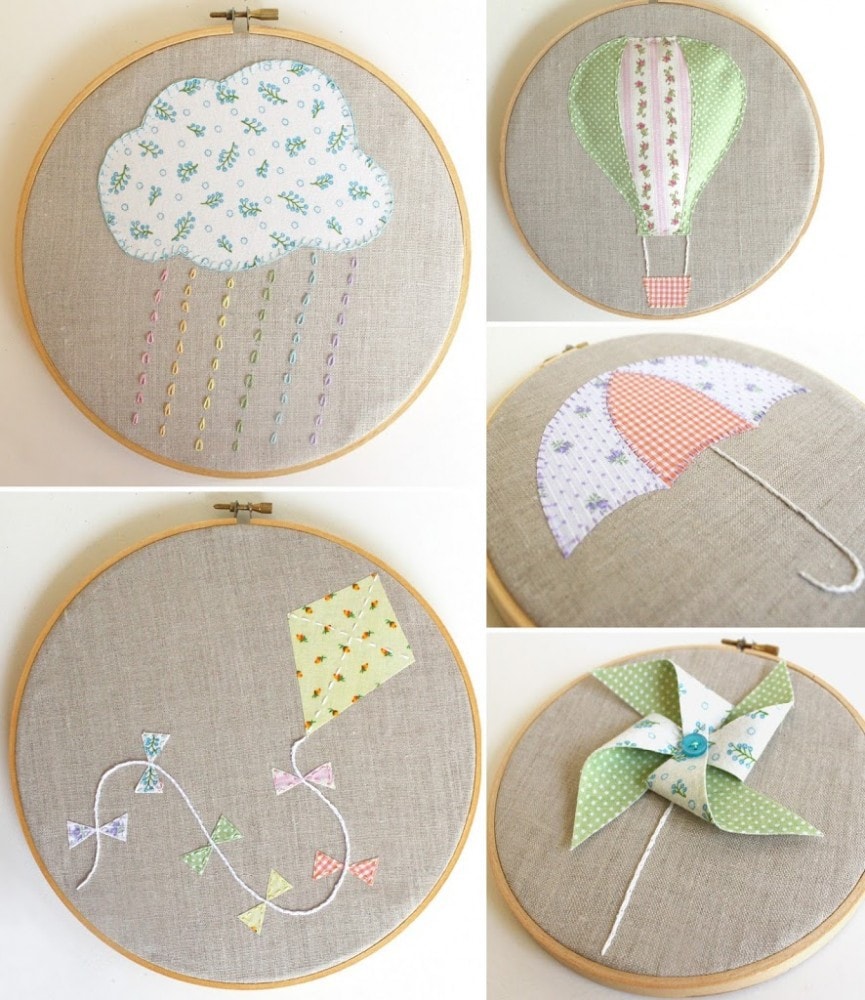
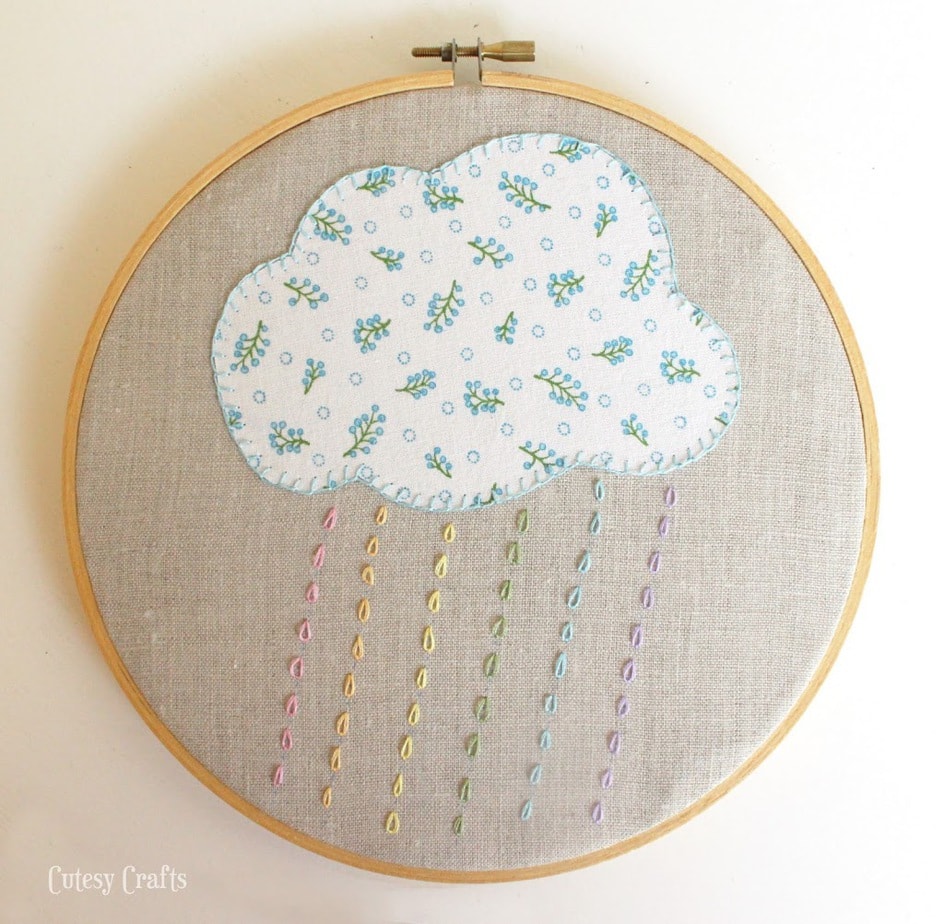
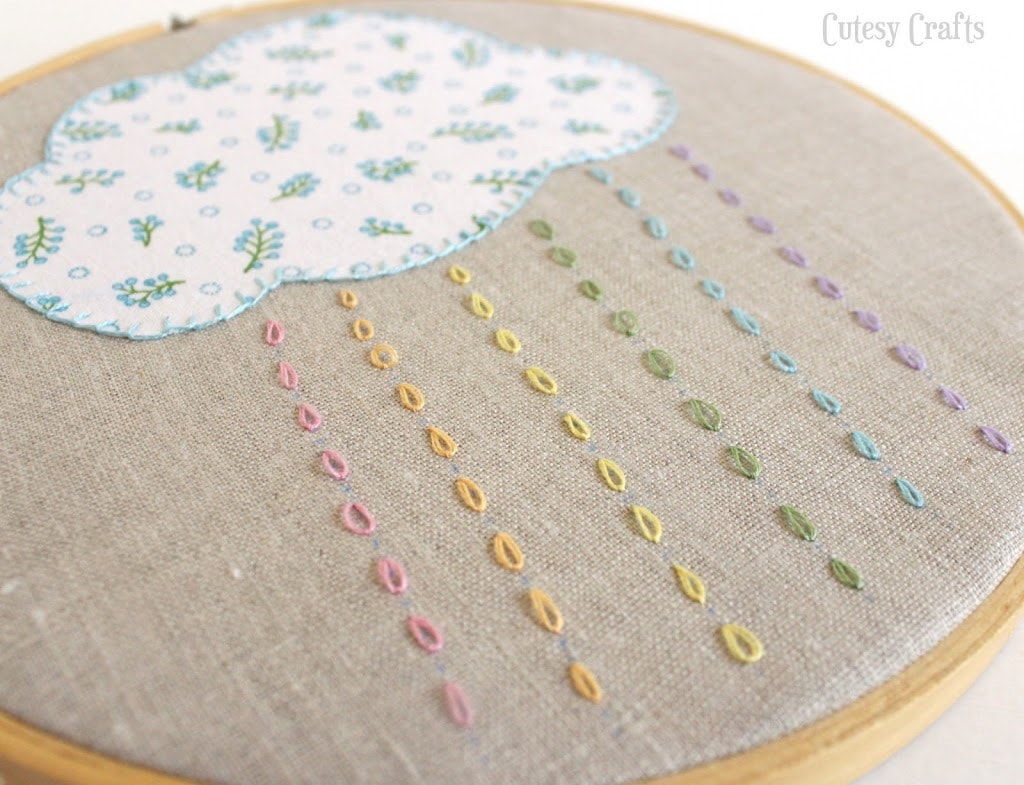
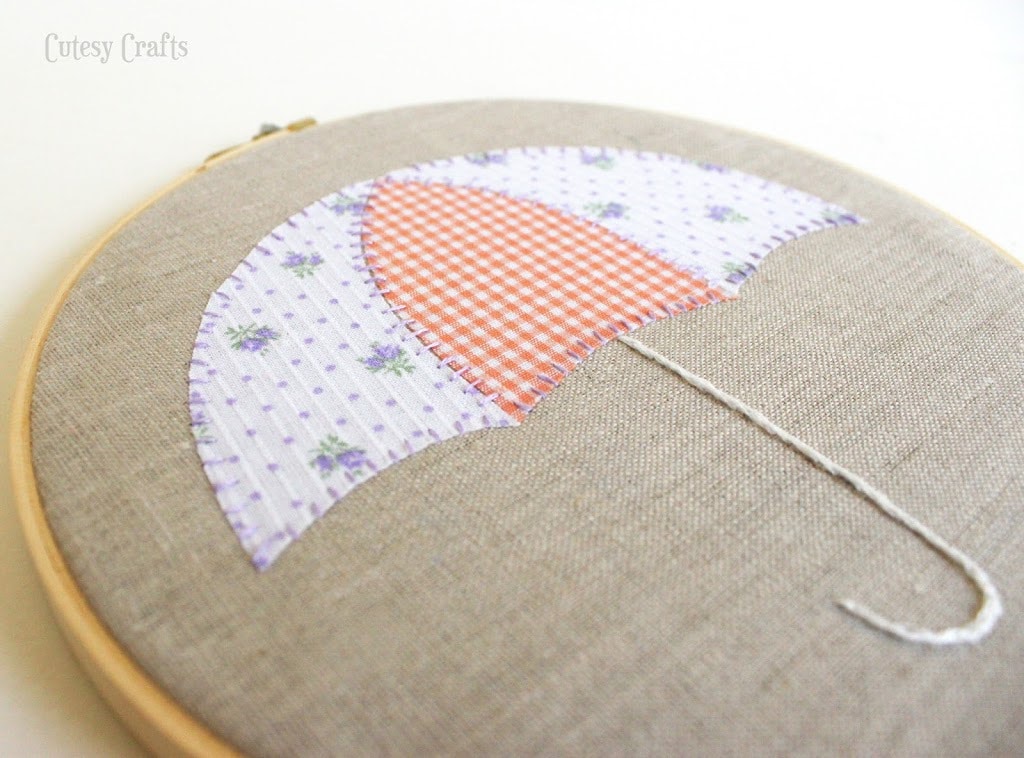
There is a different color fabric on the appliques to match each color in the rainbow. I went for muted colors instead of bright. Most of the fabrics were from my grandma’s stash that she let me dig through. I tried to make it so all of them had a sort of vintage feel. The hot air balloon is stuffed a little to make it pop out, and the pinwheel is 3D also. The raindrops are lazy daisy stitches again because I think they are so cute!
Supplies needed:
- free embroidery patterns – The larger ones will need to be printed as a “poster” and taped together. The size of each hoop is noted on the pattern. The pattern is password protected, so you’ll need to enter the super secret password first. To get the password, enter your information in the form below to sign up for my free email newsletter. You will get an email with the password. Already subscribed but forgot the password? No need to subscribe again! Every email newsletter I send has the password in it, so check the latest one.
- linen fabric
- fabric scraps in colors of the rainbow (or lighter colors like I chose)
- embroidery floss in colors of the rainbow, white, hair colors, and dark gray
- wooden embroidery hoops in the following sizes: 6″, 7″, two 8″, 9″, and 12″
- a button
- fiberfill (stuffing)
- fusible, paper-backed interfacing (Wonder Under or Heat ‘n Bond)
I didn’t take any photos of the process, but I thought I would show you some larger photos of the final project so you can replicate them. For all of the appliques, I ironed fusible interfacing to the fabric, cut them out, peeled off the paper backing, and ironed them onto the linen. This is a standard applique process. To see my “How to Applique By Hand” video, go here. To transfer the embroidery designs, I like to use dressmaker’s carbon paper. Just spritz with water when you are done and it should disappear. The background fabric is 100% linen.


There you go! Let me know if you have any questions. I am always happy to help!
You might also like these other projects:


Love your designs and work. Always love to learn new crafts❤️
I love hand work and your designs are adorable.
I have fell in love with your designs
Trying to get the secret password to download the pattern with the 2 little girls.
Send me an email jessica@cutesycrafts.com
I am interested in the free pattern of the two girls but received no email with the password. Yes, I checked my spam. Thank you.
email me jessica@cutesycrafts.com
I love the two sweet little girls.
Thank you!
Love your patterns! I always want to embroider something different!
Thank you so much!
I love the 2 girls pic. Do you sell them made?
Thank you! No, I don’t sell finished pieces. You might be able to find someone on Etsy that does custom work that could make one though.
These are wonderful!!!
Hi do you have a sister and little bother? I would love to do this and give it to their mother my niece
I don’t. Just these girls.
Looks like I’m a little late to the party, but I love these. As I don’t have kids, I think I’ll figure out how to add my dog and cat. Thanks for sharing!
Oh that will be so cute!
Thank you for these GREAT PATTERNS!!! I want to post a picture but I can’t. I am making the little girls for my mom and my sisters
I lover you 2 cute girls. There are 3 of us that are in our late 60’s we to to school together together. I wanted to make us three in a hoop. I’ll have to make the redhead a strawberry blond & my friend a sandy brown. But then put us together in a hoop & them to my friends.Hope they like it.
beautiful xx
Thank you! <3
Very Cute. The girls remind me of Lili Popo`s patterns.
Thank you! Oh, Lili Popo’s patterns are adorable!!!
Beautiful!
So, so cute! Thinking about teaching my granddaughters how to embroider using these ideas.
So glad you like them! I love that you are teaching your granddaughters how to embroider. My daughter is almost to the age where she has enough patience to learn.
Just found your website and love (I found it through Downgrapevinelane). Your patterns are adorable and sweet. Thank you for sharing and inspiring. Now, I need to decide which one to begin stitching.
I love all the details that you added! I also love that each hoop could stand alone but when hung with the other hoops forms such a pretty scene. Those little girls you stitched are just precious and I’m sure that your girls will treasure them.
Thanks so much for linking up to last week’s Stitchery Link Party! Aloha hugs!
Absolutely adorable! Thank you so much for linking. I love the patterns, especially the main ones with the rainbow. Any little girl would love these!
So imaginative and so endearing.
Your work is so wonderful! It must bring you great joy.
Could you tell me what kind of thread you used and how many strands to do the red hair? I’m just starting to embroider. The thread seems pretty glossy for regular DMC thread.
Thank you! It’s just regular old DMC floss. The hair is 2 strands.
Your embroidery patterns are just adorable! 😀 Your embroidery work is lovely.
Thank you!!! 🙂
I love the simplicity of your work.
Thanks, Jackie! 🙂
LOVE ALL OF YOUR PATTERNS! Cant wait to start them. Thank you so much!!:)
Oh, thanks so much, Dawn! Glad you are using them! 🙂
These are lovely. The girls remind me of my daughter and her best friend at nursery. Love it!
Catherine
Thanks, Catherine!
This may be a stupid question, but how you keep the raw edges from unraveling?
Not a stupid question at all. Do you mean the edges of the appliqued fabric pieces? I ironed a fusible webbing called Wonder Under (pellon 805) onto the back of the fabric before I cut it out. You peel off the paper and then iron the fabric onto your project.
Oh, thanks! I dabble in a bunch of different kinds of crafts and I want to give embroidery a try. 🙂
You will love it! Youtube videos have been the best for me to learn different kinds of stitches. Good luck!
I love thel ittle girls. I can’t figure out what size hoop you use, or does it matter.
You have found a new follower today. Looking forward to seeing more. I found you on pinest.
Pat McDonough
Hi Pat! So glad you like them! I put the size of the hoops on the patterns, so you should be able to find it once you download them.
How do I get the pattern for the little girls,I love them.Tamara R.
You have to fill out the subscription form in the post, check your email to confirm it, and then you will be taken to a page with a link to the patterns. If that doesn’t work for you, send me an email, and I will get the patterns to you.
parabéns todos muito lindo…
These are beautiful. You are so talented!
Camilia
Thanks so much Camilia!
Simply beautiful!!! love it…A blessed talent!! How did you do the brown curly hair ? 🙂
Thanks Judet! The curls are just a bunch of french knots. 🙂
These are simply gorgeous! Now following your blog, pinterest board and Fb page with pleasure. Thank you for sharing x
Thank you so much for following along! I appreciate everyone who does!
Hi Jessica I have a question, I’d like to embroider this series and am wondering if you can tell me which patterns will need to be printed differently. I’m not sure what you mean when you say they may need to be printed as a poster and taped together. For instance when I open the hot air balloon pattern the print preview shows the pattern being cut off if printed using a regular letter size paper the only way the preview displays the entire pattern being printed on one page is if I select the ledger size which is 17×11. Would that work if printed using the ledger size paper instead of taping individual letter size pieces together? Thank you for any guidance you can provide.
On another note, I absolutely adore all of your designs, you are one uber talented momma! Thank you a million times over for being so generous and sharing these with us for free.
?, Sara
When you print them, if you check the box “actual size” or something like that in the print options, it should print as the size I designed. It’s been a while since I designed those ones, so I’m not sure how I did them. They were the first embroidery patterns I ever designed.
Love.Love.Love. Those little girls are awesome!
You have wonderful talent.
Love.Love.Love. Those girls are awesome!
I love all of them! So, so cute!
Thanks, Jeni! I had so much fun creating them!
I love these. So beautiful. My favourite from the competition x
Very imaginative and lovely!
Hugs from Bulgaria!!!