
How to Sew by Hand for Beginners
So you’ve got something to sew, but you don’t have a sewing machine. Or maybe you just like the process of hand sewing better. In this tutorial, I’ll show you step-by-step how to sew by hand for beginners. I’ve been doing it for years. It’s way easier than you think, and I have tons of pictures and a video to help you along the way.

How-To Video: Hand Sewing Stitches
Everyone has different learning styles, so if you’d rather watch a video than look at photos, I’ve got one below.
Sewing by Hand for Beginners
Step 1: Gather Supplies for Sewing by Hand

(This post may contain affiliate links, which means I may receive a commission, at no extra cost to you, if you click a link and purchase something that I have recommended. As an Amazon Associate I earn from qualifying purchases.)
Hand Sewing Supplies:
- fabric – Most any fabric will do! You can start out with some scraps if this is completely new to you, or just go for it! The great thing about sewing is you can always take out stitches if a mistake is made.
- needles – For basic hand sewing I just have a few sizes of “sharps” or all purpose sewing needles on hand.
- thread – I use an all purpose sewing thread for this. It’s 100% polyester. Choose a color that matches your fabric if you don’t want the stitches to show. I’ll be using a contrasting thread so you can see my stitches.
- scissors – You want a sharp pair of fabric shears for cutting the fabric, and I also like to have a smaller pair of embroidery scissors for snipping thread.
- pins – Straight pins aren’t necessary for small jobs, but come in handy when you are sewing something large. Use them to hold your fabric in place while you sew.
- ruler and/or measuring tape – Use this to measure seams and mark lines.
- fabric marking pen – Any disappearing fabric marking pen will work.
- seam ripper – You’re going to make mistakes, and a seam ripper makes it easier to remove stitches.
- needle threader – Only necessary if you feel like you can’t thread a needle without it.
- iron and ironing board – An essential for large projects, but you can probably do without it for something small.
Step 2: Thread Your Needle
Before you can even think about sewing, you’ll need to thread your needle. This can be trickier for some than others, so I have a few tips for you.
How to Thread a Needle when Sewing by Hand
- Take a piece of thread the length from your fingers to your shoulder (about 20-25 inches). Make a clean cut on the end of the thread with a pair of sharp scissors.
- Wet the end of the thread with water or lick it (gross I know, but everyone does it!)
- With the needle in one hand and the thread in the other, line up the thread with the hole in the needle and push it through.
- Pull the thread through about 5 inches and make it so it goes the same direction as the longer end of the thread.
- Tie a double knot at the end of the longer side of the thread. Now you’re ready to do some hand sewing!
- If you can’t get the thread through the hole, try a needle threader. I have a review post on needle threaders for embroidery here, but some of it still applies to regular hand sewing.

Step 3: Hand Sewing a Seam
What is a seam?
A seam is basically when you sew two pieces of fabric together. The part you sew is called the seam. There are different ways to sew seams by hand, and I’ll show you two methods.

What does right-sides-together mean?
When sewing a seam, you would put your fabric right-sides-together, which means when you put the fabric together, the pretty (or printed) sides are touching. Put straight pins down the fabric if you’d like to keep it from sliding around.
What is a seam allowance?
The seam allowance is the distance from the raw edge of the fabric to the spot where you are sewing. Here I have marked my fabric 1/2-inch away from the raw edge that I’m sewing. This would be a 1/2-inch seam allowance.

How to Hand Sew a Seam with a Running Stitch
When should you use a running stitch?
The running stitch is a fast and easy way to sew a seam, so you can use it when the item you’re sewing won’t get a lot of wear. Use shorter stitches when you want them to be permanent, and longer ones when you are just basting the fabric together.
What is basting in sewing?
Basting is just a fancy way to say that you are sewing things together temporarily. You use longer stitches than you normally would so you can more easily remove them later. This is often done to temporarily sew things together before machine sewing them.

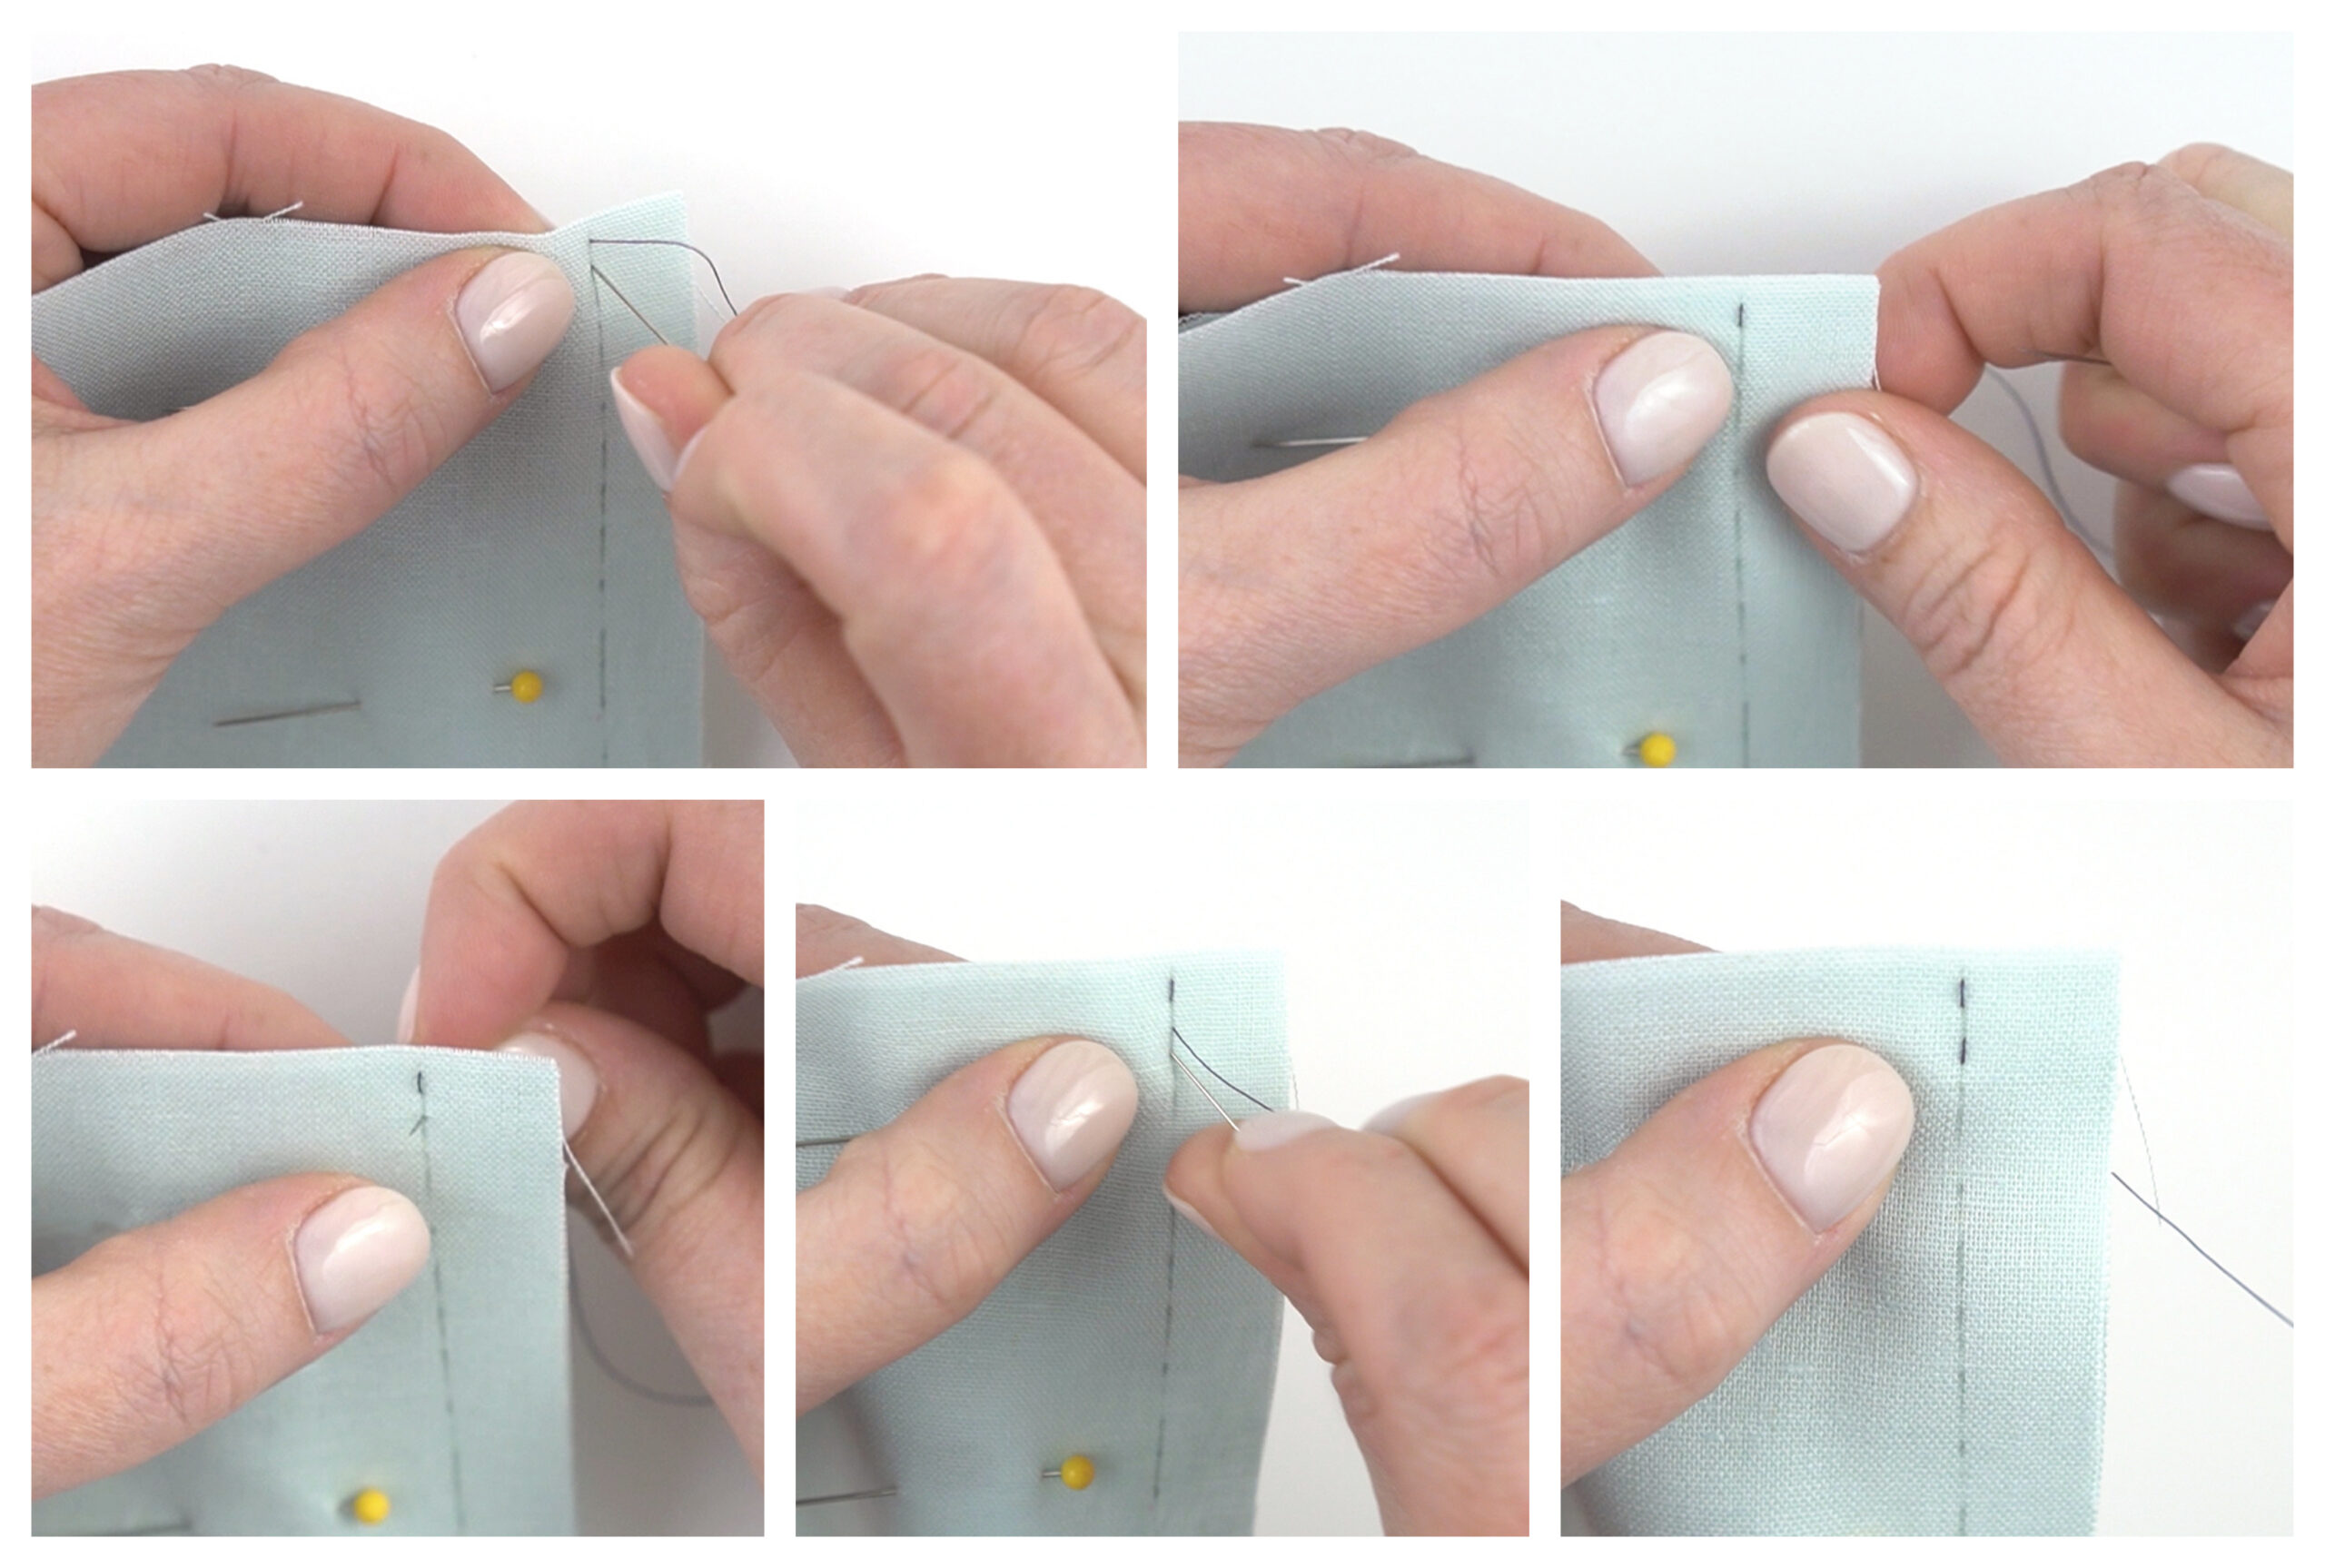
Running Stitch Steps:
- Bring the needle up near the top of your seam and make sure the knot catches on the back.
- Go forward one stitch length and push the needle back down into the fabric.
- Bring the needle up one stitch length from the back to the front.
- Go forward one stitch length again and push the needle back down into the fabric.
- Repeat steps 3 and 4 until you get to the end of your seam.
- Once you get to the end, turn your fabric over to the back, run your needle under the back of an existing stitch, leave a loop and pull your needle through it to make a knot.
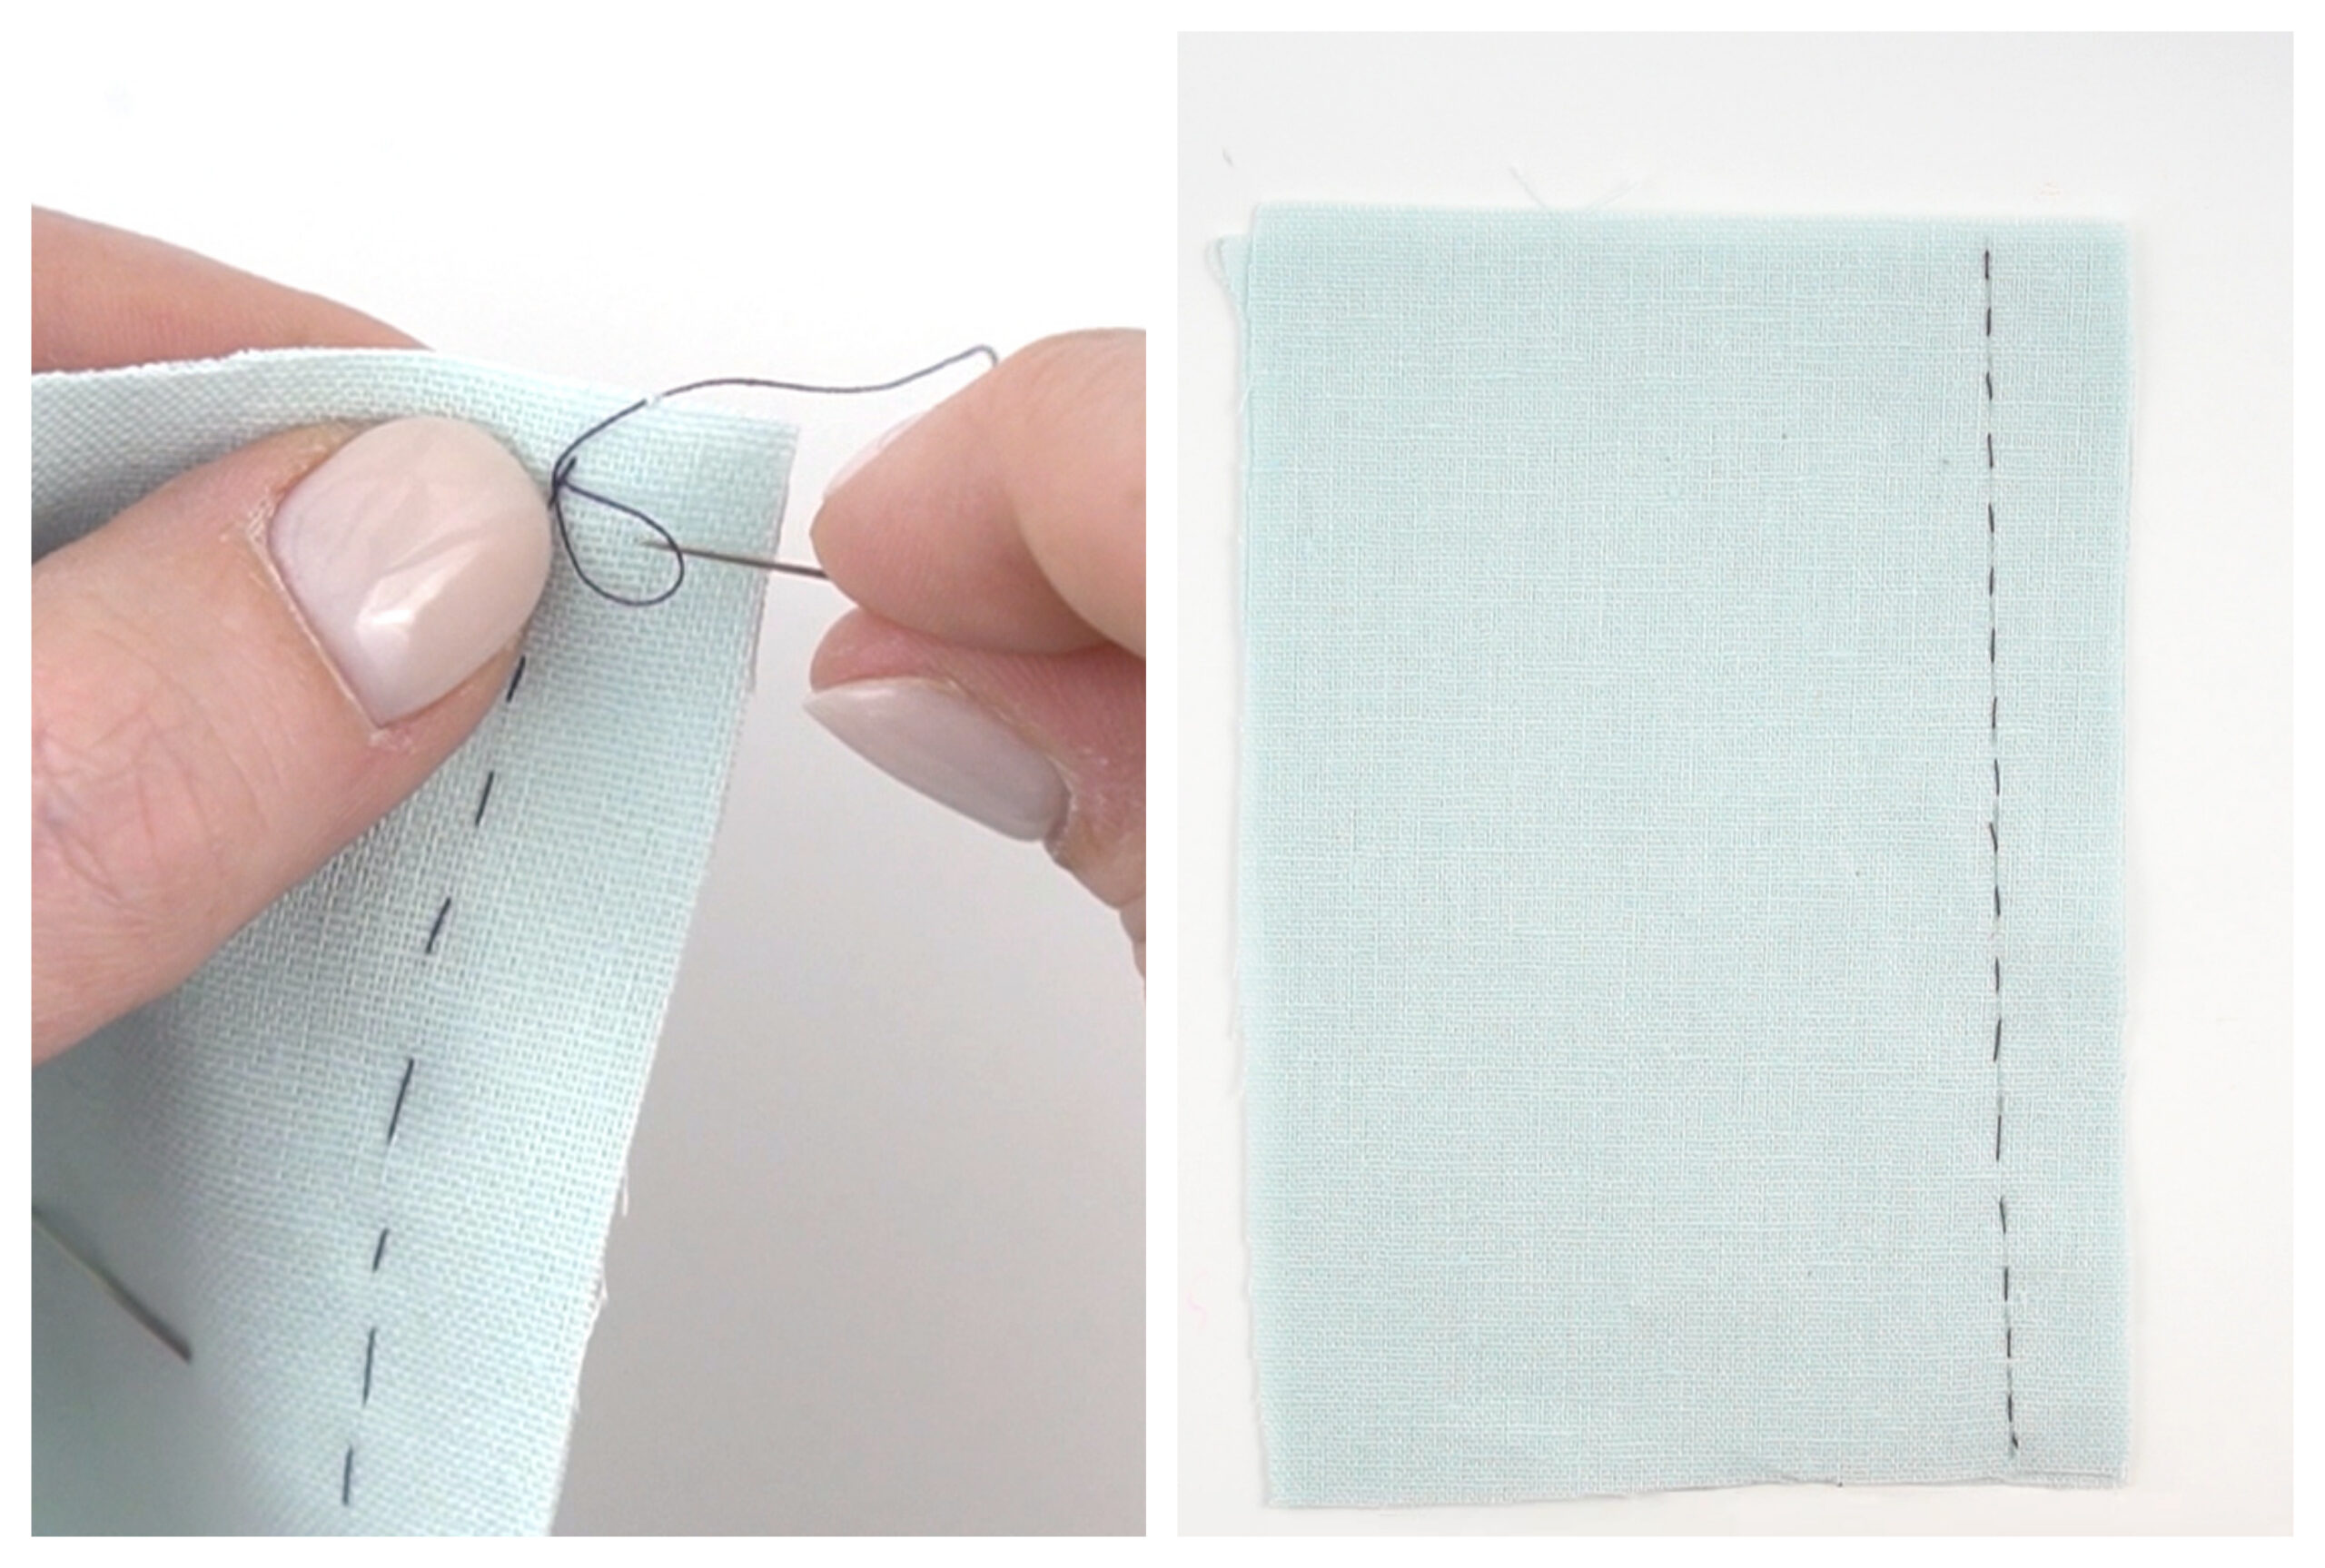
How to Hand Sew a Seam with a Backstitch
When should you use a backstitch?
Use a backstitch when you want your seam to be a little stronger. This stitch will produce results that look closest to what a sewing machine creates and gives you a tidy and strong seam.

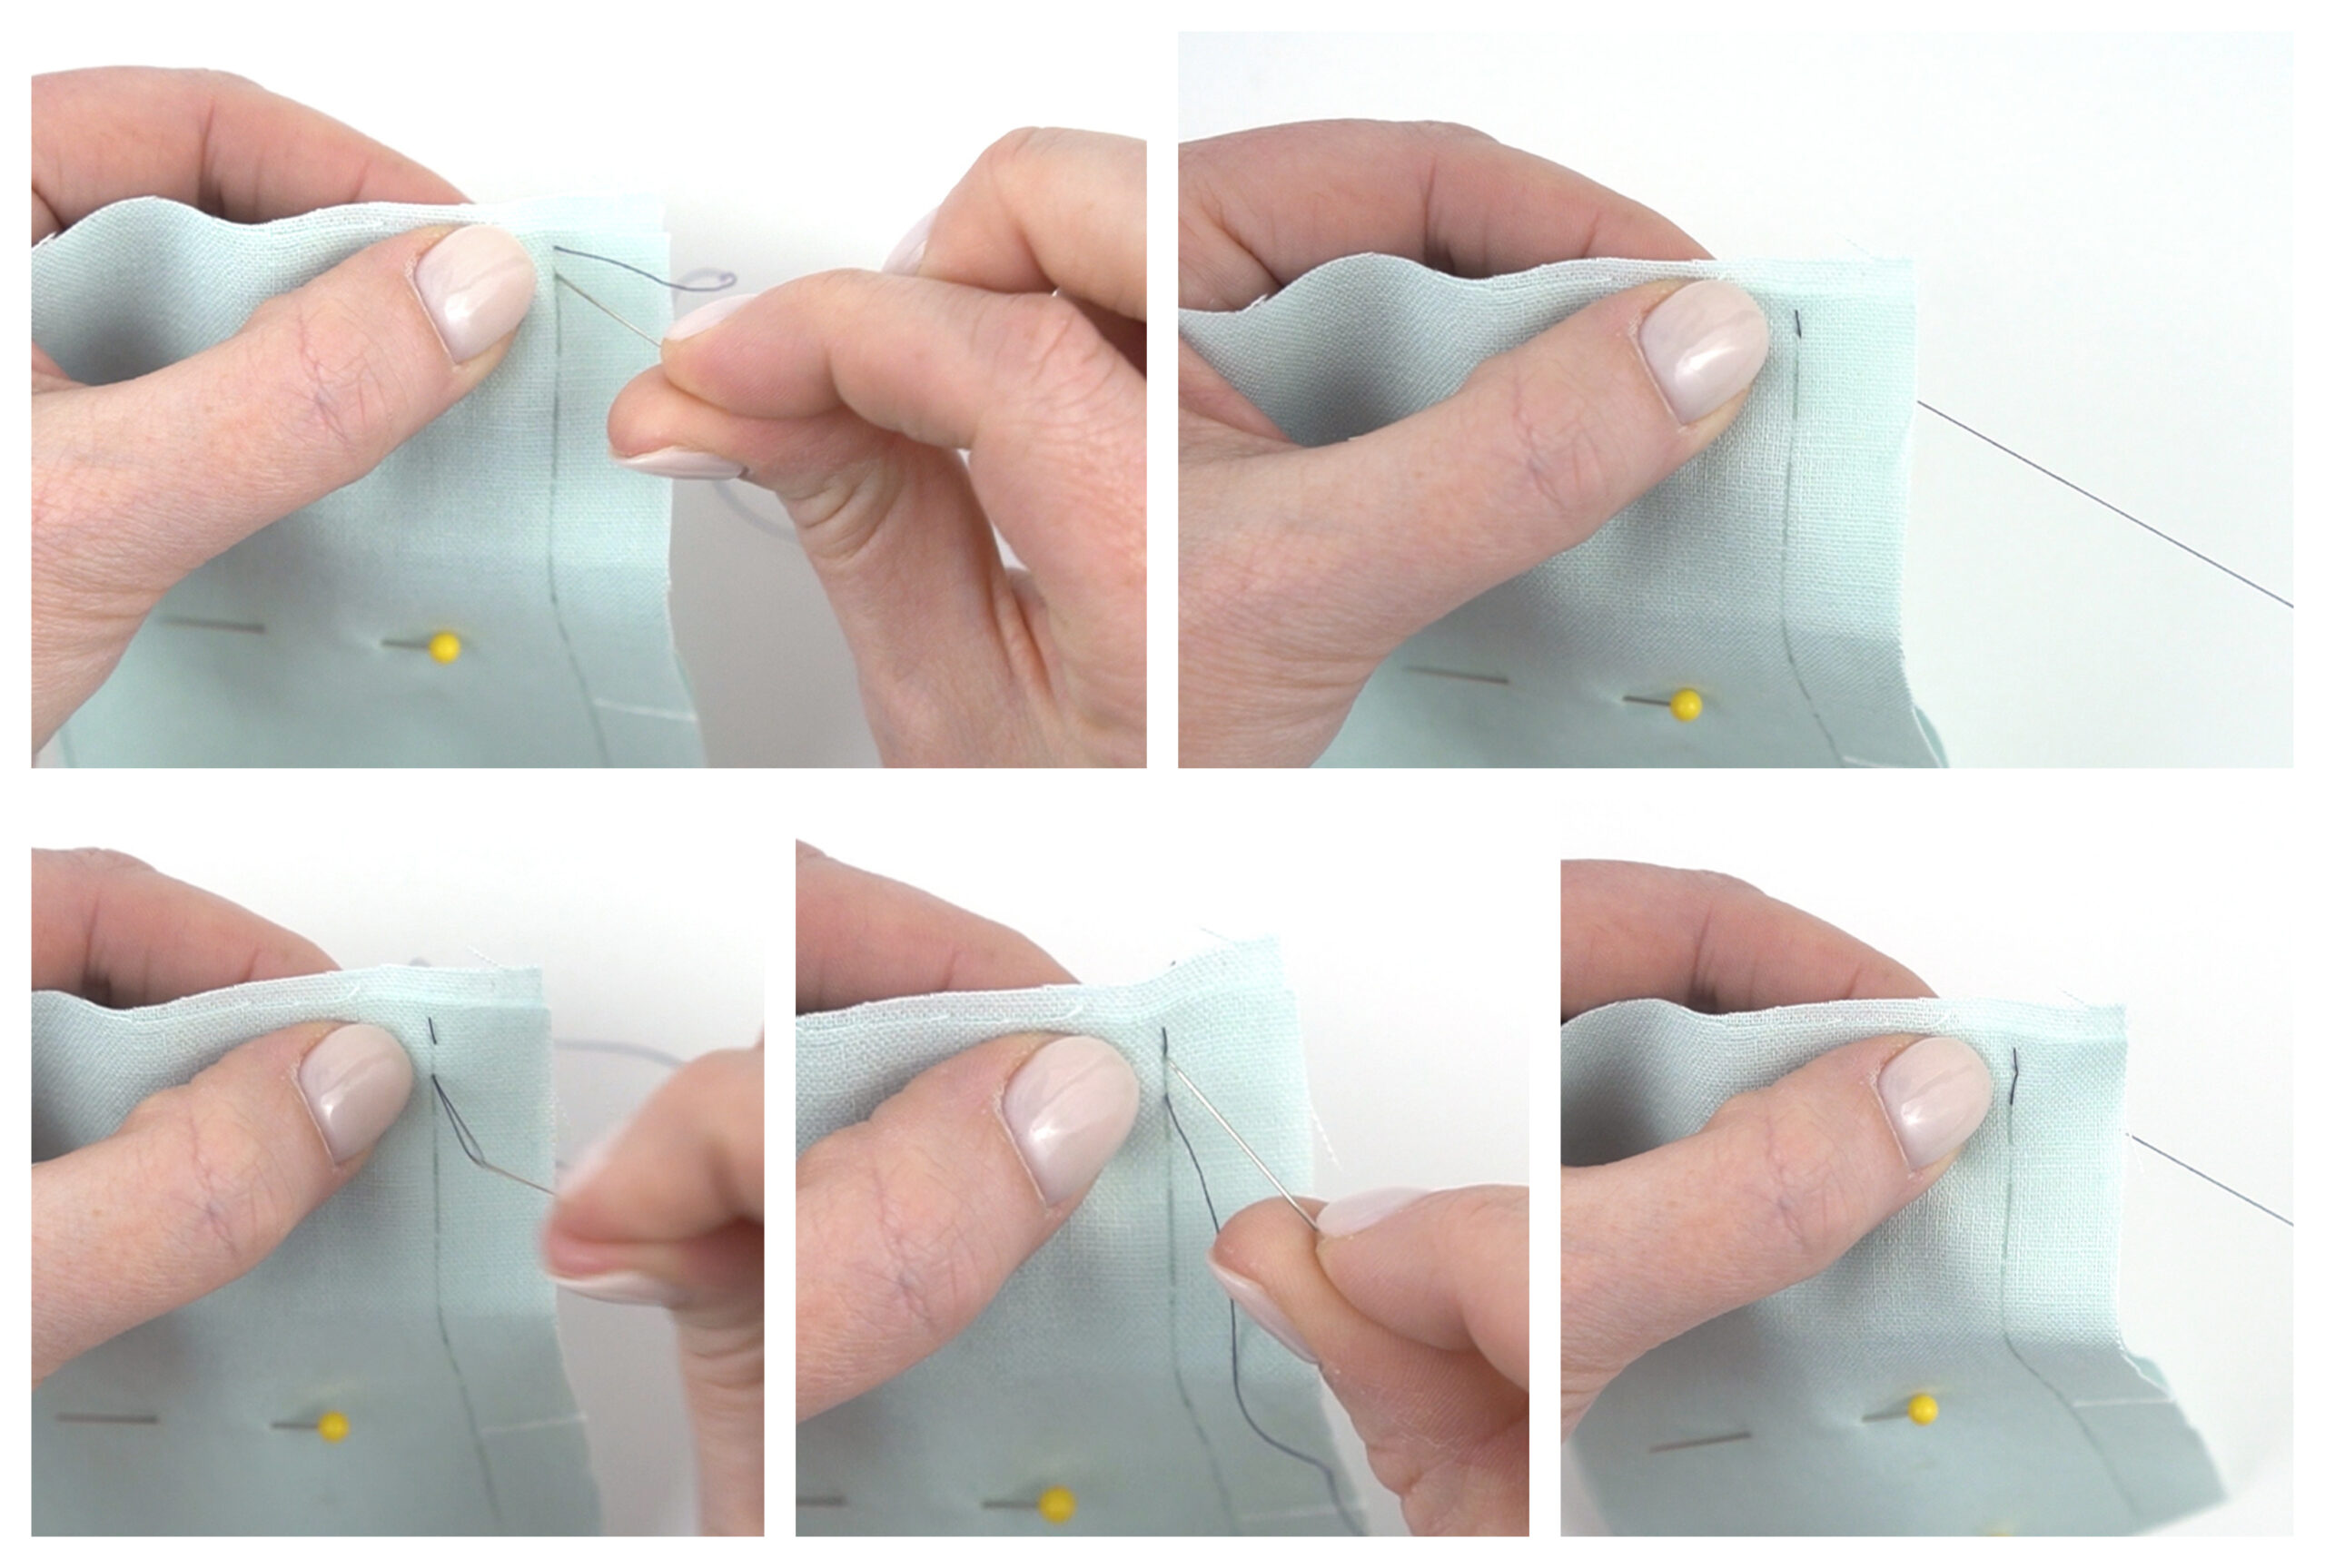
Backstitch Steps:
- Bring the needle up near the top of your seam and make sure the knot catches on the back.
- Go forward one stitch length and push the needle back down into the fabric.
- Bring the needle up one stitch length from the back to the front.
- Go back one stitch length and bring the needle down in the hole that the previous stitch went down in. (This is what gives this stitch the name backstitch.)
- Repeat steps 3 and 4 until you get to the end of your seam.
- Once you get to the end, turn your fabric over to the back, run your needle under the back of an existing stitch, leave a loop and pull your needle through it to make a knot.
Step 4: Sewing an Opening Closed
A lot of times in sewing, you’ll stitch around all sides of your fabric and leave a small opening. You turn it right-side-out using that opening, and then you have to hand sew it shut. This is done frequently when sewing things like pillows and stuffed animals.


Hand Sewing an Opening with a Slip Stitch (Ladder Stitch)
When do you use a slip stitch?
Use a slip stitch to sew up openings in fabric when you don’t want your stitches to show.

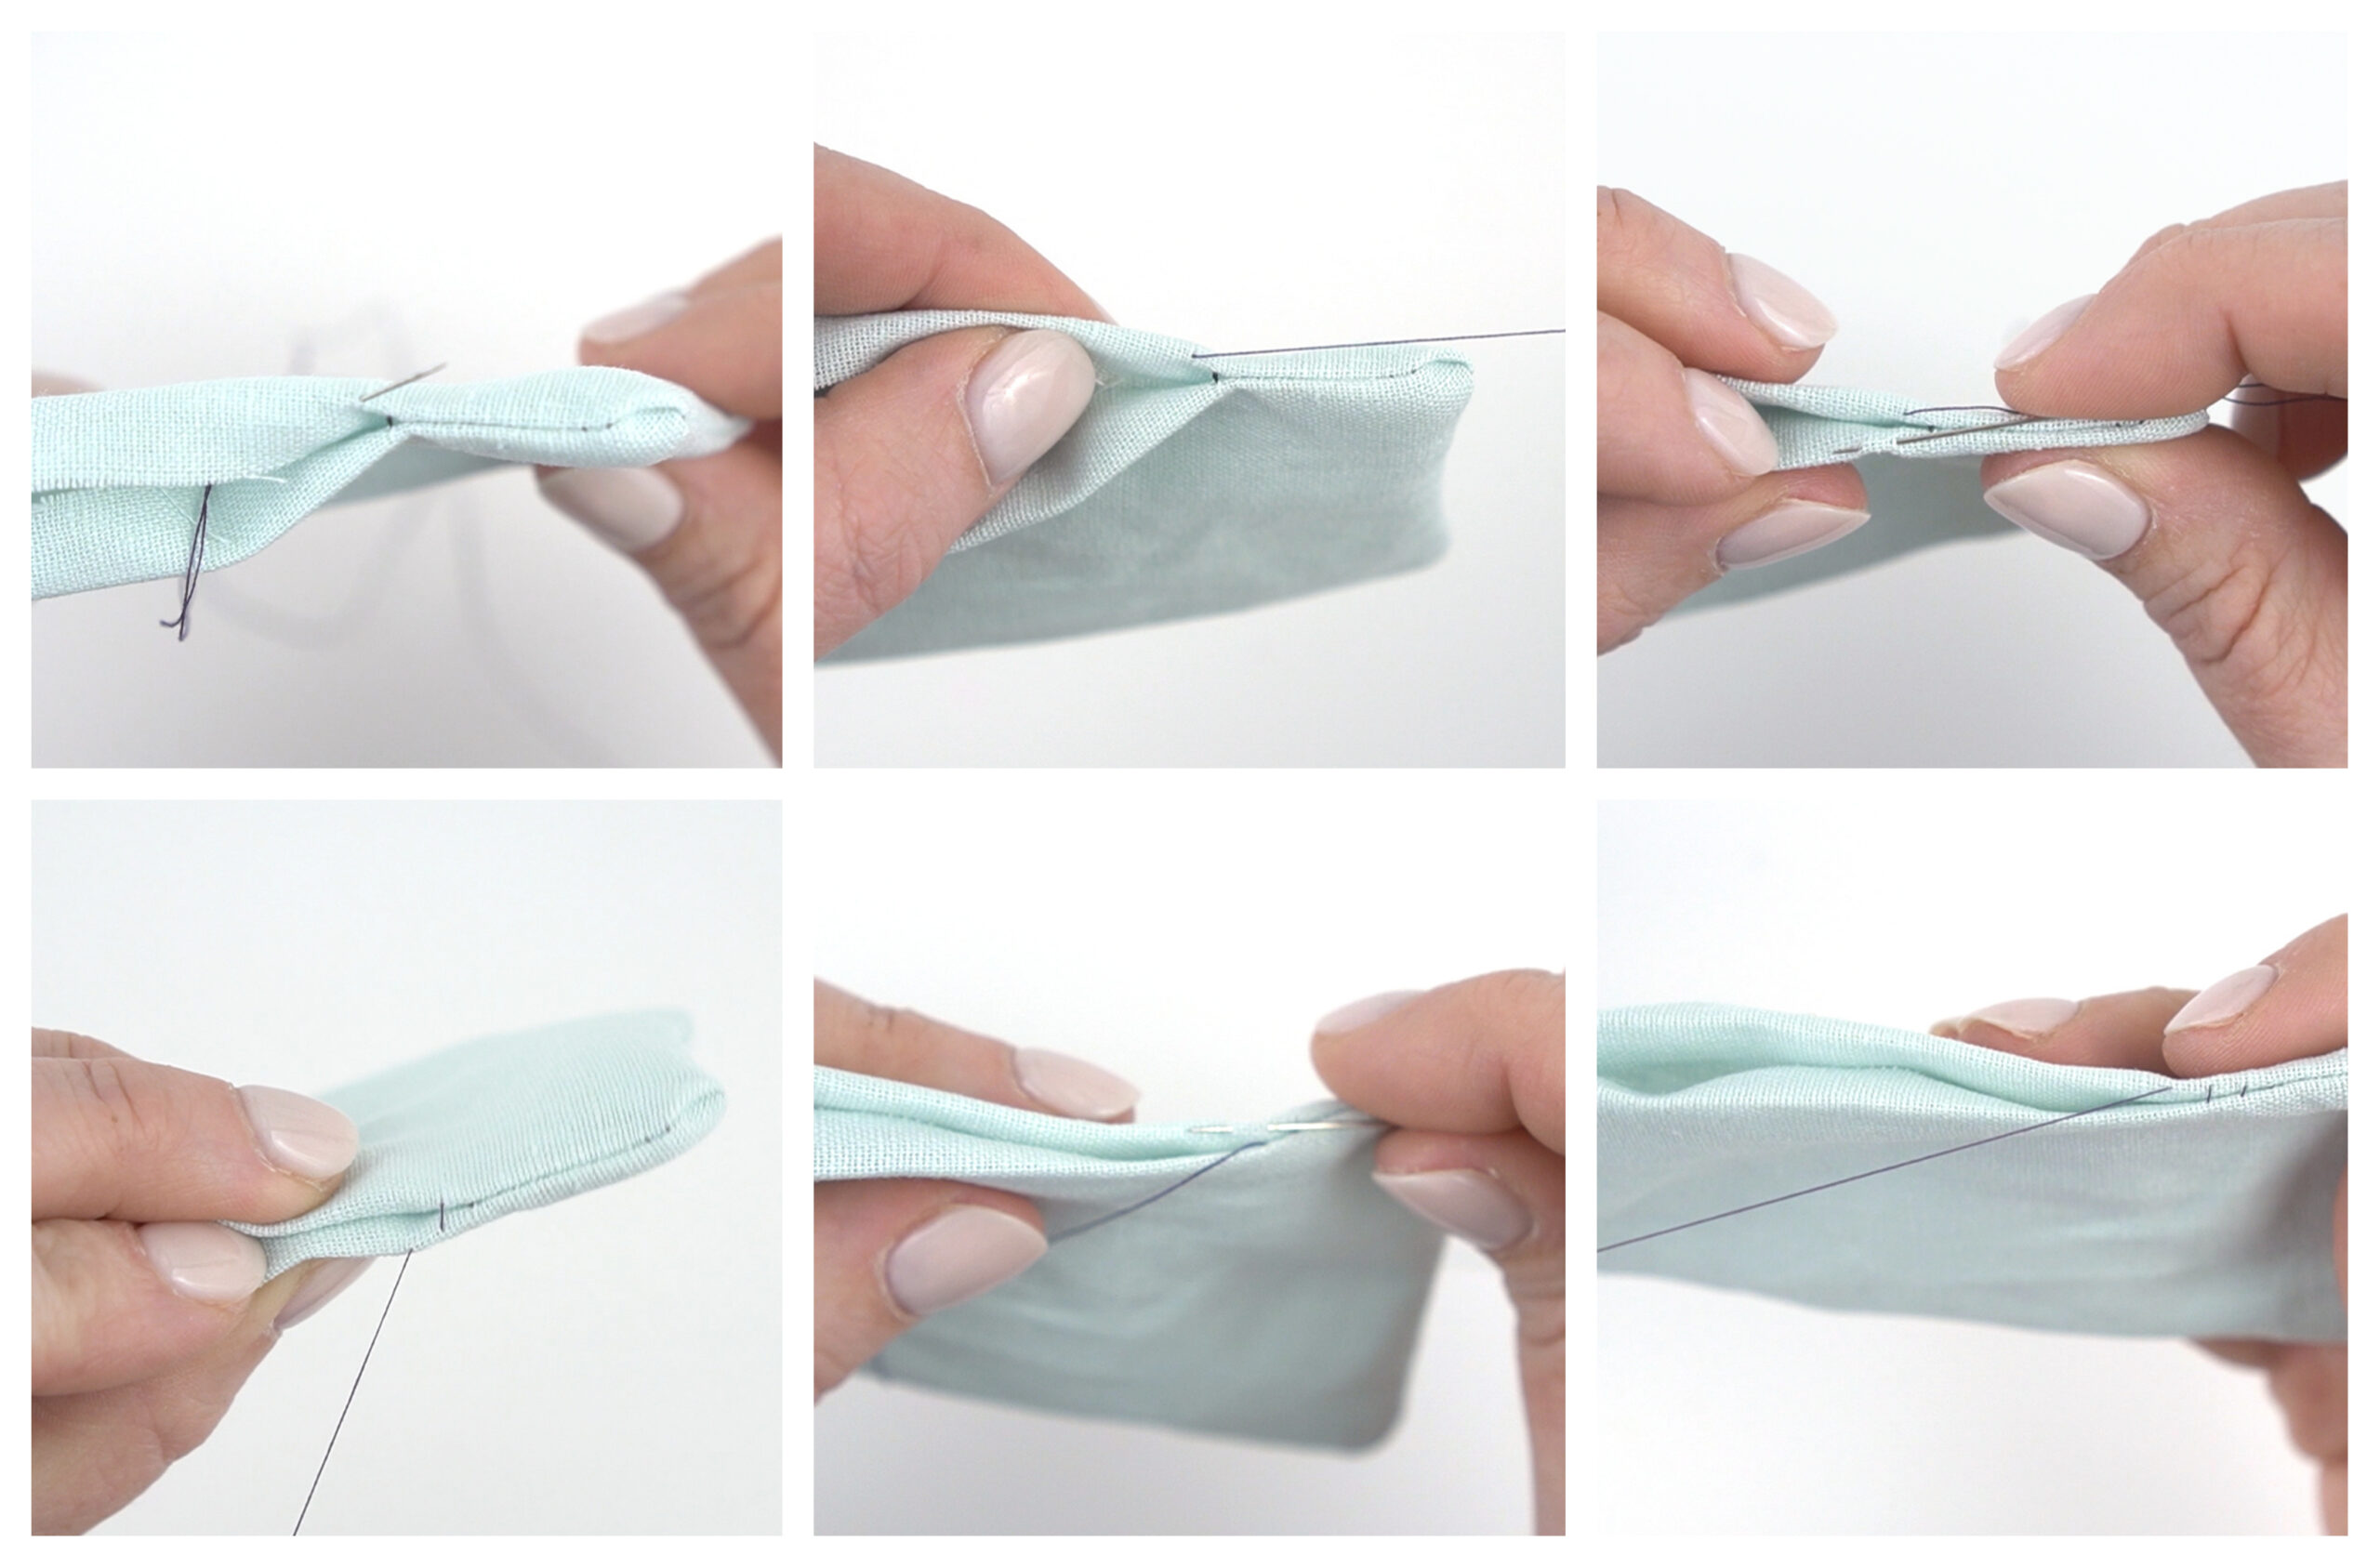
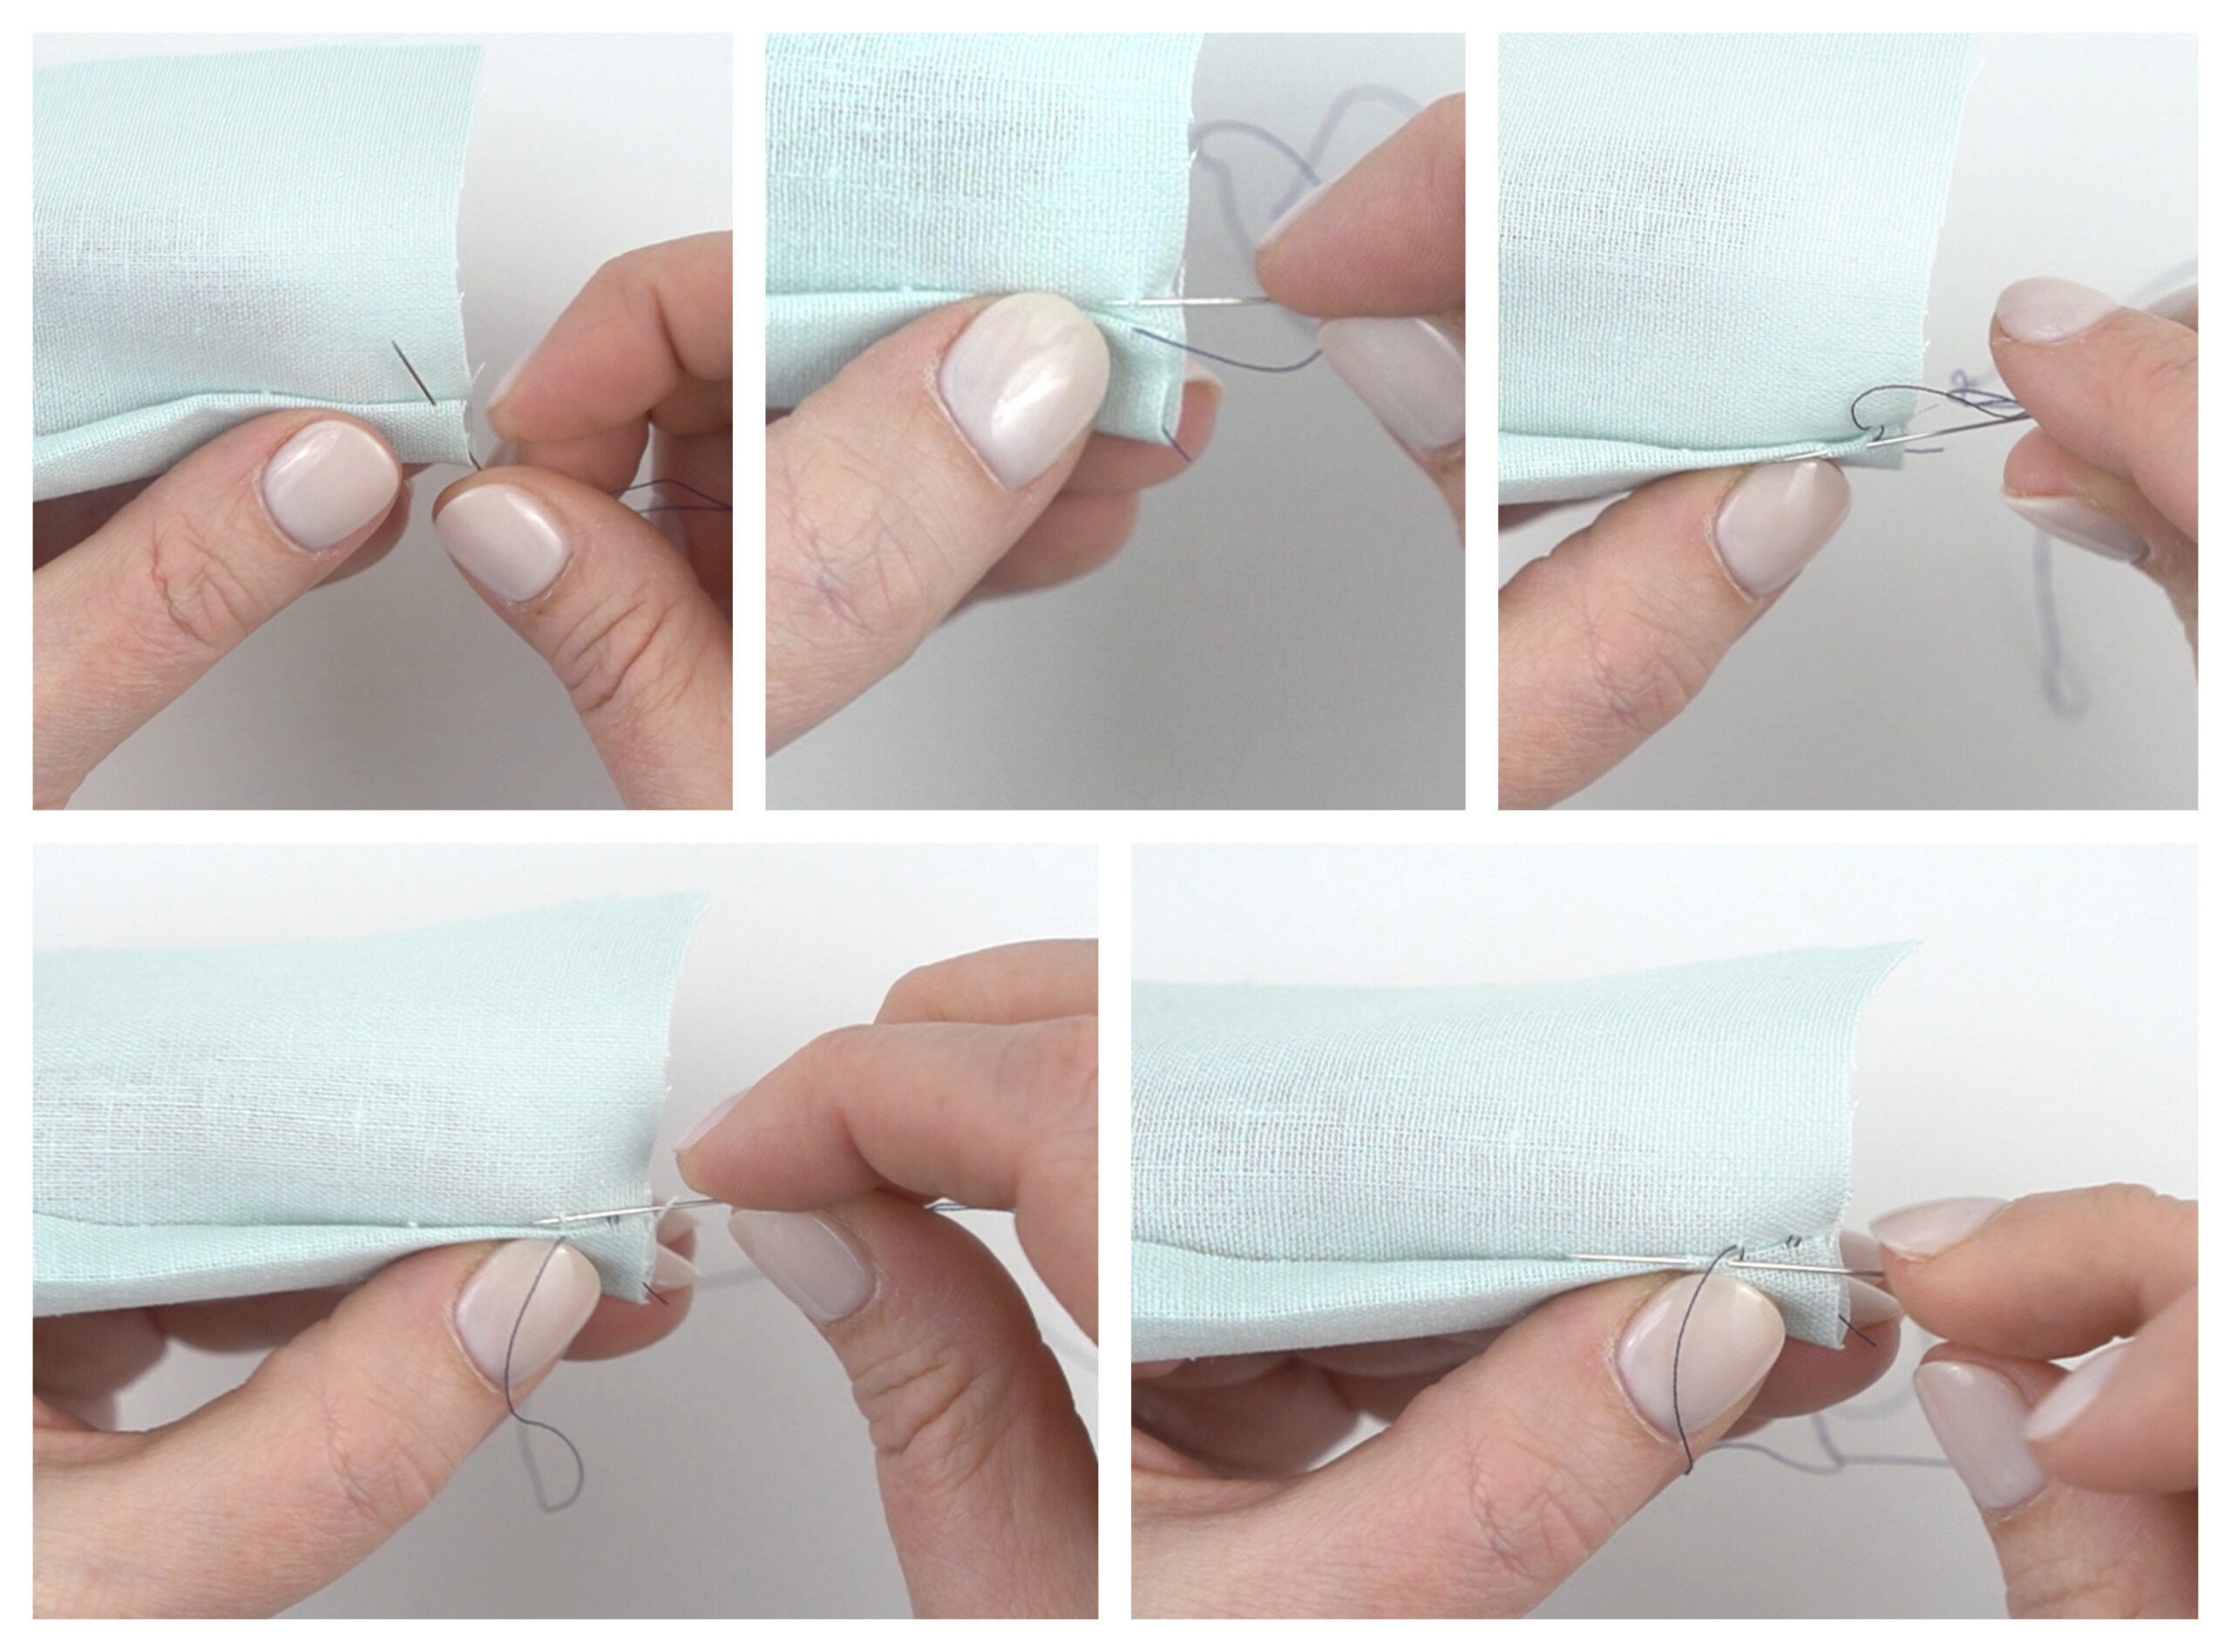
Slip Stitch (Ladder Stitch) Steps:
- Fold the raw edges of your fabric inside the piece you’re working on and press with an iron for best results.
- Bring your needle up inside the opening, along the fold line, and make sure the knot catches inside.
- Push the needle down on the opposite side of the opening into the fold line. Push it to the left about 1/4-inch and bring the needle back up on the fold.
- Take your needle back to the side of the opening you started on, and push it down into the fold line. Push it to the left about 1/4-inch and bring the needle back up.
- Repeat steps 3 and 4 until you get to the end of the opening.
- Once you get to the end, run your needle under an existing stitch, leave a loop and pull your needle through it to make a knot.
- Push the needle through the seam and snip the excess thread as close to the fabric as possible.


Step 5: Hand Sewing a Hem
What is a hem?
A hem is when you hide the raw edge of fabric by folding it up twice and sewing. This is frequently done when sewing the bottom of curtains, pants, or skirts.
How do you create a hem?
Fold your fabric up about 1/4-1/2 an inch and press with an iron. Fold up up again however many inches you would like your hem to be and press again. You make larger folds in pants and skirts if you want to make them longer in the future for a growing child.


How to Hand Sew a Whip Stitch Hem
When should you use a whip stitch?
A whip stitch is the easiest way to sew a hem when it doesn’t matter if the stitches show on the back. You can also use it as a decorative stitch if you want the stitches to show.


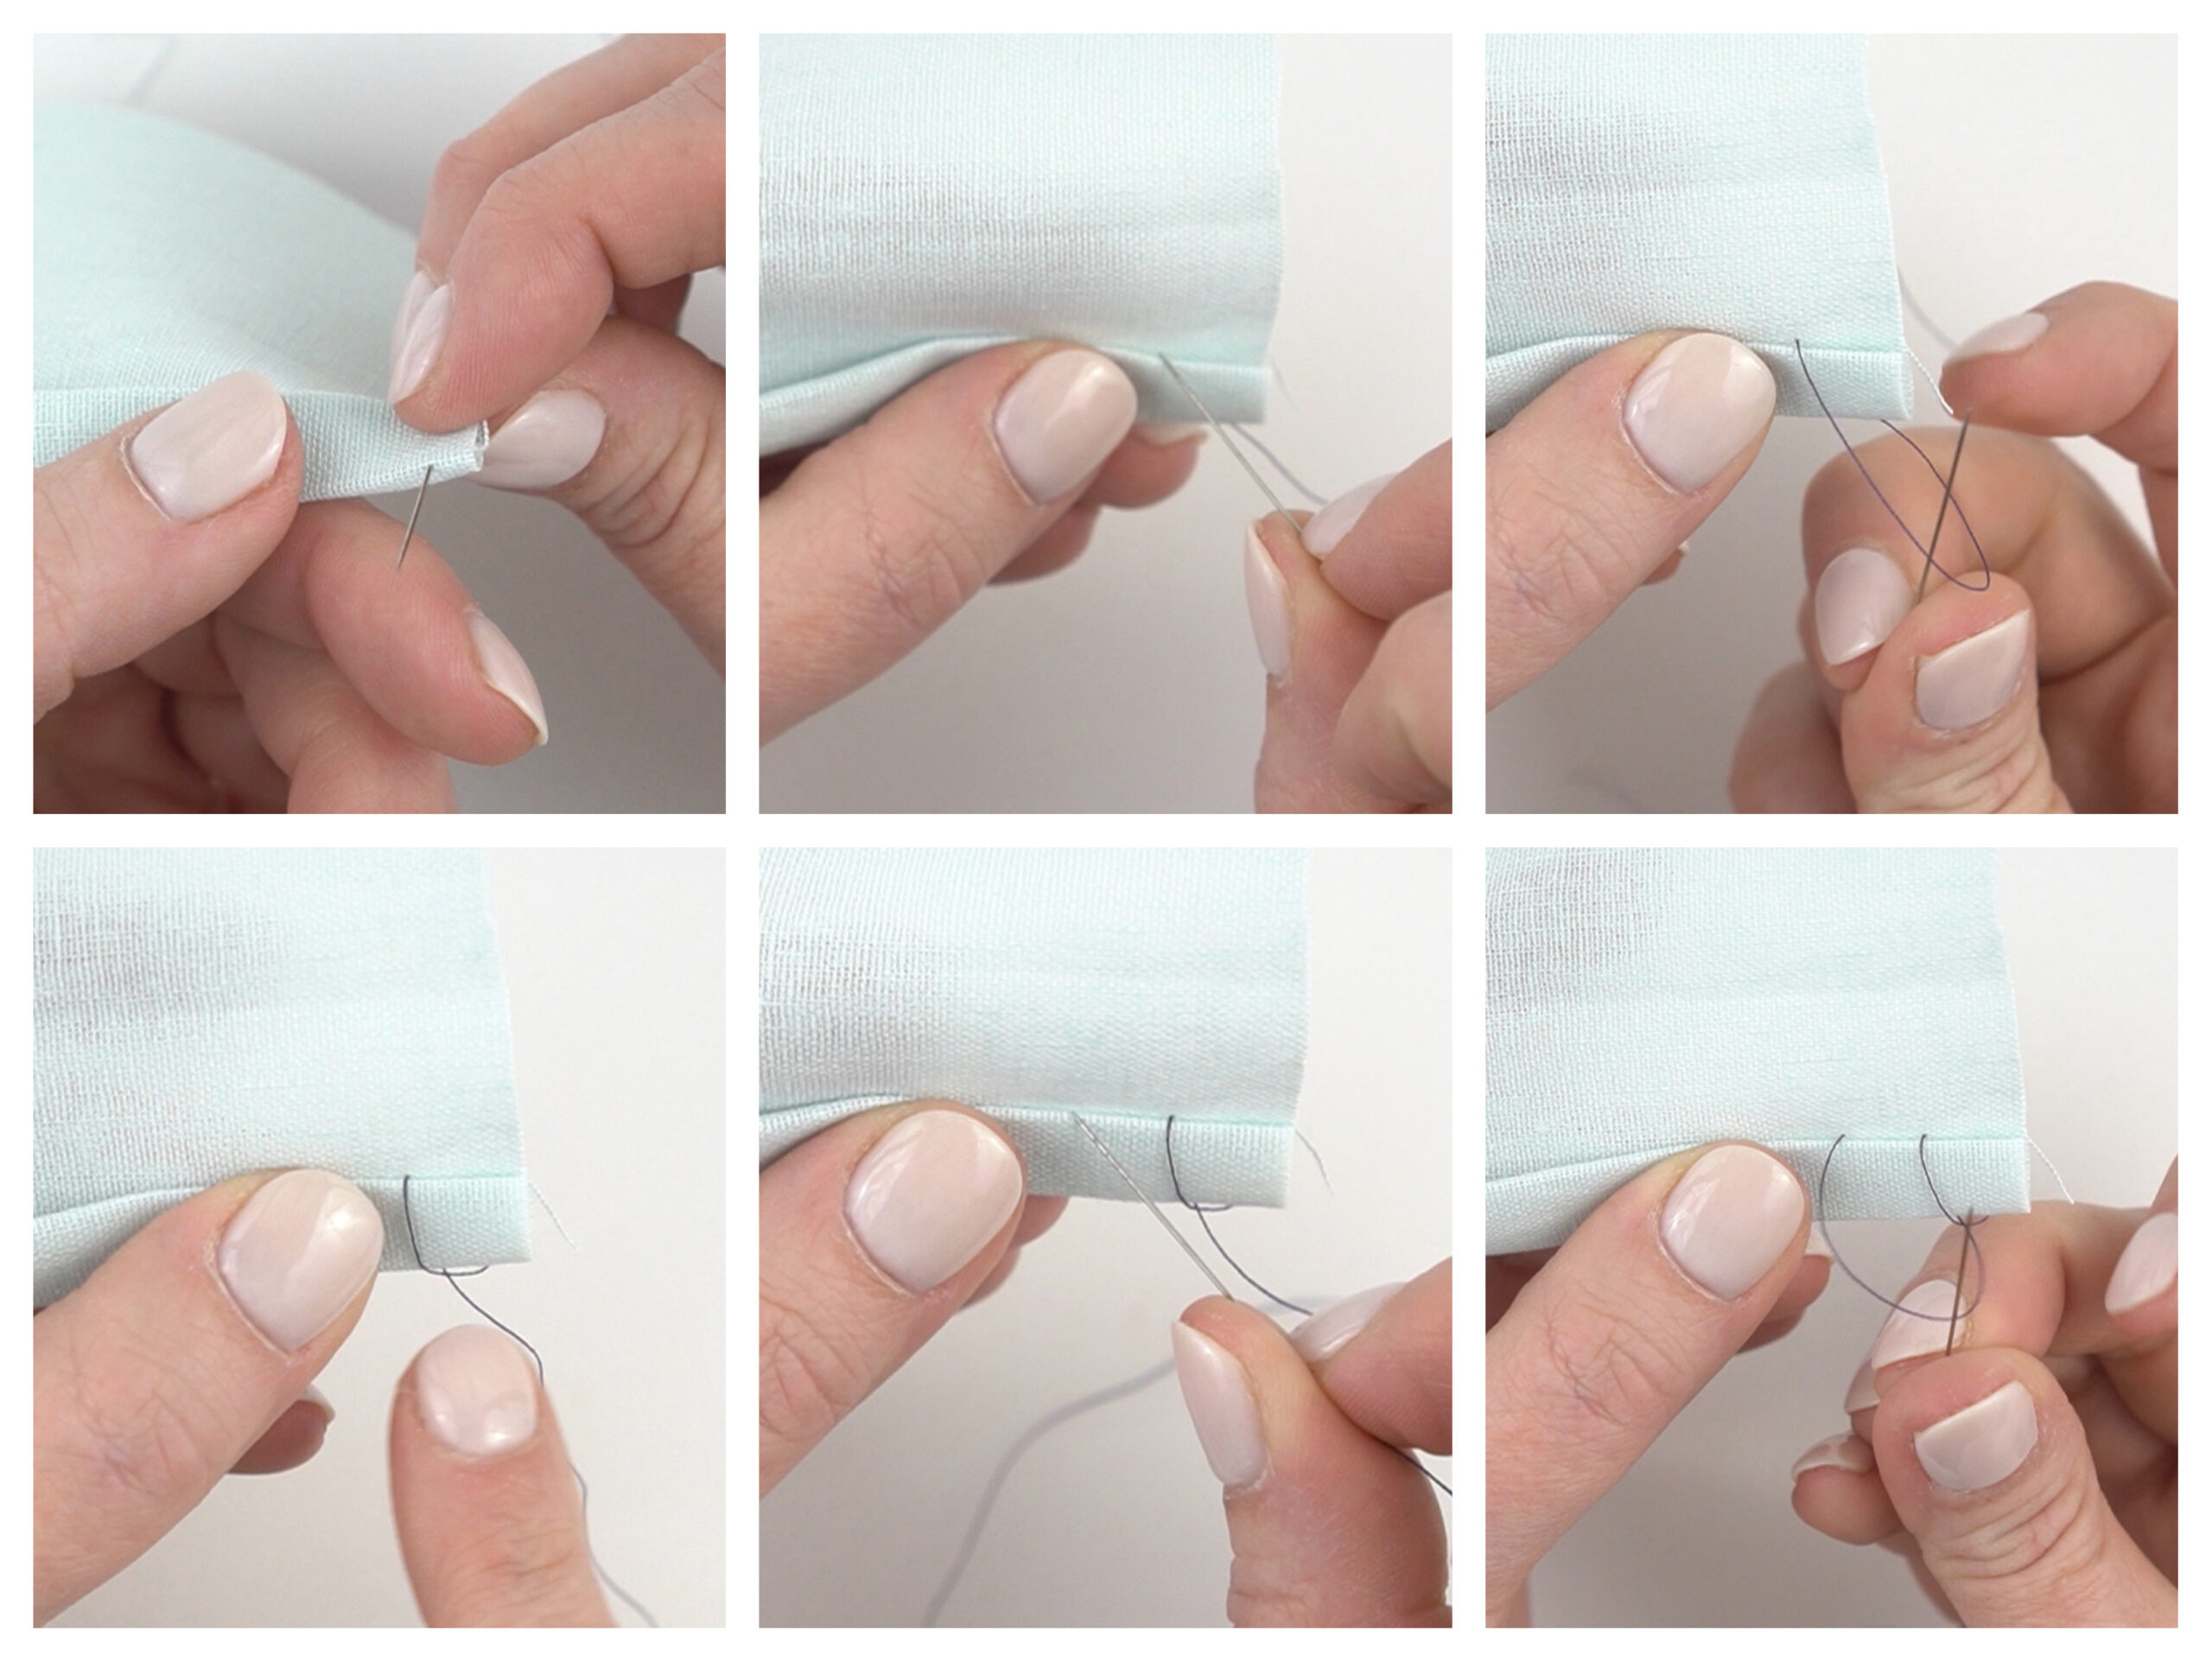
Whip Stitch Steps:
- Bring the needle up inside the fold and push it through the top. Make sure the knot catches on the back.
- Bring the needle to the left at an angle and grab a small amount of fabric from above the fold. (This stitch will show on the front, so make it very small, only grabbing a couple threads from the fabric.)
- Push the needle through the back of the fold just below where you grabbed the fabric.
- Repeat steps 2 and 3 until you get to the end. When you get the hang of it, you can do the grabbing and pushing through the fold in one motion.
- Once you get to the end, run your needle under an existing stitch, leave a loop and pull your needle through it to make a knot.

Hand Sewing a Blind Hem Stitch
When should you use a blind hem stitch?
The blind hem stitch is probably the most popular way to hem curtains and pants. Use this when you don’t want the stitches to show on either side of your fabric. When you use thread that matches your fabric, the stitches are virtually invisible.

Blind Hem Steps:
- Bring the needle up inside the fold and push it through the top. Make sure the knot catches on the back.
- Bring the needle straight up and grab a small amount of fabric from above the fold. (This stitch will show on the front, so make it very small, only grabbing a couple threads from the fabric.)
- Bring the needle back down to the fold, close to where you first brought the needle up. Push it through the fold, travel the needle along the fold about 1/4-inch to the left, and bring it back out through the top of the fold.
- Repeat steps 2 and 3 until you reach the end of the hem.
- Once you get to the end, run your needle under an existing stitch, leave a loop and pull your needle through it to make a knot.
How to Hand Sew a Blanket Stitch Hem
When should you use a blanket stitch?
Use a blanket stitch when you want a decorative edge to show on your hem. This stitch is frequently done around the edges of a blanket, and that’s where it gets its name.


Blanket Stitch Hem Steps:
- Bring the needle up inside the fold, on the bottom fold line. Make sure the knot catches on the back.
- Bring the needle to the left at an angle and push it through the fabric above the fold. Do not pull the thread all the way through, leave a loop at the bottom.
- Bring the needle around to the front, through the loop and pull gently until the stitch is secure.
- Repeat steps 2 and 3 until you reach the end of the hem.
- Once you get to the end, run your needle under an existing stitch, leave a loop and pull your needle through it to make a knot.
Step 6: Practice, practice, practice!
I know it’s cliché to say, but practice really does make perfect! Try not to get frustrated because making mistakes is always a part of the learning process. Also, don’t expect perfection because you aren’t a machine. Your stitches will be a little wonky, but that’s how you tell that a lot of love went into your project.

Hand Sewing Stitches FAQ
No, machine stitching is stronger than hand stitching.
To hand stitch evenly, you can measure and mark small lines on your finger with a pen. Then you can compare your stitches to the marks on your finger as you go. Eventually, you will become experienced enough that you no longer need to do this.
The easiest stitch for beginners is the running stitch.
If you liked this tutorial, you might also like my How to Embroider for Beginners post!
You’ll Also Like:


I’m only 10 so please sign something I can do please 🙏 thank you 😊
I’m just beginner in swwing and so appreciate for this advices!