
Embroidery Transfer – How to Transfer an Embroidery Pattern
Finding out how to transfer an embroidery pattern can seem a little daunting. There are so many different embroidery transfer methods to choose from. Which one should you use? I tend to switch around to the different methods, depending on the type and color of fabric I am using. I’ll walk through each of the different embroidery transfer methods, when I use them, and the pros and cons of each. If you find this post useful, make sure to take a look at my How to Embroider for Beginners series.

(This post may contain affiliate links, which means I may receive a commission, at no extra cost to you, if you click a link and purchase something that I have recommended.)
How to Transfer an Embroidery Pattern
FriXion Pens and a Light Table
Best for: light/white fabric
Pros: easy to see, disappears with heat
Cons: may not disappear completely
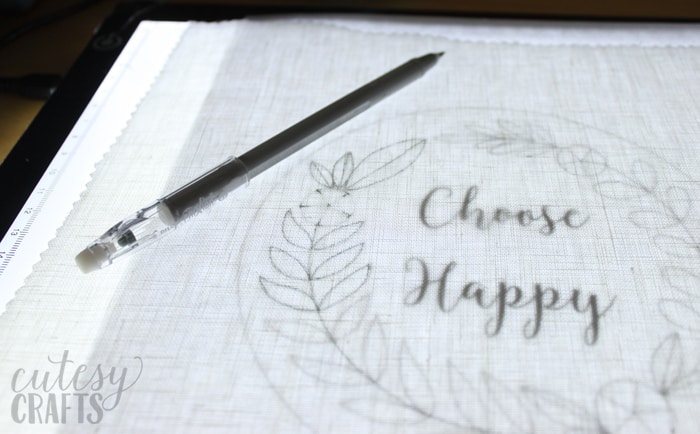
Any time I am using light/white fabric, that I can see through, I use my FriXion pens. This is the easiest, and most straightforward embroidery transfer method for me. All you do is place your pattern on a light table or tape it in a sunny window. Place your fabric on top, and trace the outline of your pattern. When you are done stitching, use an iron over any marks that are still showing, and they will disappear.
I only use the very lightest color gray pen for this because it disappears the best. It’s important to know that the marks may not disappear completely, so make sure to only mark in places you will be stitching. If there is a little bit that shows on the sides of your stitches, it’s not a big deal though. That is what the iron is for. If anything is left after ironing, it will just be a very faint impression. This shouldn’t cause a problem if it’s just on the edges of your stitches. The marks may come back in very cold temperatures, but can be ironed away again.
Dressmaker’s Carbon Paper
Best for: medium colored fabric or black/dark blue fabric
Pros: washes away easily
Cons: difficult to trace, hard to see

For medium-colored fabric, such as natural linen, I like to use the blue carbon paper. For black or dark blue fabric, white carbon paper works best. For this embroidery transfer method, you put your fabric down first, put your carbon paper on top of the fabric (color side down), and your pattern on top of the carbon paper. Grab a pencil and trace VERY firmly over your entire design. Make sure the carbon paper is under every part of the design that you are tracing. It might be a good idea to tape your pattern and fabric down to make sure it doesn’t shift. You will be left with a faint impression of your design. When you are done stitching, brush away any marks that are still showing with your finger or spritz with a little water and rub the marks. Never iron over these marks.
This method can be difficult for some because you have to press pretty hard to get a good impression. My hand usually feels a little stiff after tracing a pattern like this. The blue on the medium colored fabric can be pretty hard to see, especially for more detailed designs. I find it works very well using the white on dark fabric though. I feel this is also your “safest” method since the marks come out pretty easily.
Fabri-Solvy
Best for: multi-colored fabric, dark gray fabric, other
Pros: easy to see
Cons: have to soak piece in water, less enjoyable to stitch
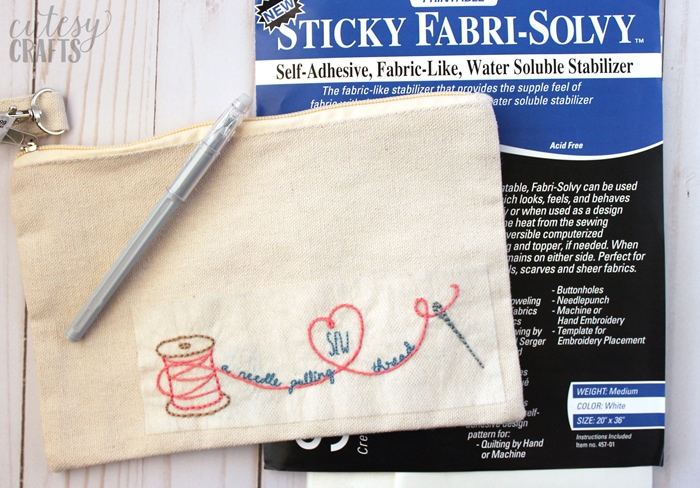
I have been toying around with Fabri-Solvy a lot lately. In fact, I’ve filmed a whole video on transferring embroidery patterns on dark fabric with Fabri-Solvy. It’s a really great embroidery transfer method for detailed designs and fabrics that are hard to use any of the other methods on. For example, I wouldn’t be able to see anything else on a multi-colored or dark gray fabric. Use a light table (or a sunny window) to trace the design on the soft side of the Fabri-Solvy. Peel off the paper backing, and stick to your fabric. Stitch through the Fabri-Solvy then soak your piece in water when you are done. The Fabri-Solvy will dissolve, leaving just your design on the fabric.
This product sounds like a dream, but there are some things I don’t like about it. Part of the reason I love to embroider is because of how relaxing it is. The Fabri-Solvy just takes away some of that enjoyment for me. The stickiness makes my needle a little more resistant going through the fabric, I can’t see what my final piece is going to look like until the end, and it tends to wrinkle up a bit after I’ve been stitching for a while. You also have to completely soak your piece in water after. This can be a bit problematic for more dimensional shapes like woven wheel flowers. I’ve done it though. Just make sure all your stitches are where they should be when you lay it out flat to dry. You may also want to pre-wash your fabric if you think it will shrink. Not something I normally do for embroidery.
A word of warning while using this method. Don’t leave your work in a bag with a leaky water bottle! Sad story there. Half of it dissolved and the sitting water made my ink run and stain my fabric and floss. My fault, I know. For this reason I only use FriXion pens on the Fabri-Solvy now. That way, if anything runs, I can just iron over it. I mentioned before, that I only use the light gray FriXion pens on white fabric, but if you are using gray fabric, that isn’t going to work. Go ahead and use the dark blue or black pens for this. I’ve done a couple with these pens now and haven’t had problems. They also sell printable sheets of Fabri-Solvy, but I don’t really trust the ink on those not to run. Plus, I think you are supposed to use a Laser Jet printer, and I don’t have one of those. That would be really nice to just print a pattern instead of having to trace it though, so it might be worth a try.
Vanishing Transfer Paper
Best for: white or light cotton fabric
Pros: easy to see, can print pattern with printer
Cons: have to soak piece in water, only works on light fabric
![]()
PrintWorks contacted me and asked if I wanted to try some of their Vanishing Transfer Paper. It was perfect timing because I had seen it and wanted to test it out. You print it on your printer (make sure to mirror the image), iron it on, and the design transfers to the fabric with a sort of shiny film underneath it. Since you iron this product, instead of it being a sticker, you don’t get the sticky residue that Fabri-Solvy has. It’s also very clear, so I can see more of what my finished design will look like. I really liked using it.
Once your piece is embroidered, you soak it to get the clear film and print off, so your project must be something that can safely be put in water. The packaging says it’s only for light or white 100% cotton fabric, which can be a little bit of a drawback. I used it on my Essex linen/cotton blend, and it worked just fine though. It’s definitely worth trying to see if you like it.
Heat Transfer Pens
Best for: all but black or very dark fabric
Pros: easy to transfer
Cons: ink is permanent

I don’t have a ton of experience with heat transfer pens yet, but they are definitely an easy way to transfer embroidery patterns. All you have to do is trace your pattern with this pen on some paper, and the ink will transfer to your fabric with a hot iron. The line is very thin, so stitches should cover it, and you can get different colors to match your thread better.
The only downside to these is that the ink is permanent. You have to make sure every line is completely covered. When you fill a shape, you have to stitch over the lines to cover them. If you are tracing things like a lazy daisy stitch, I recommend only marking the spots where you actually need to stitch, and don’t outline the entire petals. This method doesn’t work well for me as a designer, since I like to change my mind about where lines will be sometimes. With a finished pattern, you should be okay though. It’s definitely easier than trying to see through fabric to trace patterns. I definitely recommend giving these pens a try.
Final Thoughts
This list is not meant to be comprehensive. These are just the embroidery transfer methods that I have tried that worked for me. If you have a preferred way of transferring your patterns, I would love to know about it! I’m definitely not afraid to try something new.
Cutesy Crafts is a participant in the Amazon Services LLC Associates Program, an affiliate advertising program designed to provide a means for sites to earn advertising fees by advertising and linking to amazon.com.


I am interested in transferring an embroidery pattern to a crocheted blanket. I want to add a phrase and not sure if I can transfer or not. I know if I use heat I need to put a towel over the project. Would this work.
Hmm, I’m not sure. The pen will definitely disappear even with a towel over it, so if you can get it to show up with a friction pen, that should work.
Thank you for this great resource. Just on the printable sheets, they actually recommend inkjet not laser printers and they work well. I just find that it takes a lot of soaking and sometimes rubbing to get rid if it and therefore you firstly need to preshrink your fabric and you don’t always to wash your fabric. And make sure your yarn is not going to bleed (which nowadays it shouldn’t) but I have still had reds that have.
Hi! I am looking to embroider on my own without a full kit for the first time. I am going to do something simple on tea towels as Christmas gifts. You mention using only the very lightest color gray frixion gel pen to transfer onto white fabric. Where do you buy your grey pens? The only one I can find is the one in the pack of 36 on the Amazon link. Is that it? Thanks in advance for the help!
I have found them at Michaels before, but it looks like they don’t have the individual ones anymore. They are called Frixion color sticks. I wonder if they aren’t making them as much anymore because I don’t see any. Honestly I would probably just buy any color and type and test it out. The color sticks dry up very quickly. Just make sure to cover up the ink with your stitches as much as possible.
@Jessica @ Cutesy Crafts, thank you so much for the reply!
This is super helpful for 1 at a time. I need to make 100 or so embroidery kits and wondering if you know of any manufacturers that can take a design and print it onto fabric (the kind of ink that rinses away). I’ve been scowering the internet and can’t seem to come up with anything! Thanks for any advice.
I get my kits printed with a company called Raspberry Creek, but the ink is permanent. At one point I reached out to Colonial Patterns. They do custom iron-ons that you might be able to more easily transfer. I think their ink rinses away if I remember correctly.
This very helpful. Thank you.
I’m looking for tiny embroidery transfers
So much information! Thank you very much. I am going to try and transfer the embroidery pattern. Thank you, again.
Love your website and the information is so helpful! I appreciate the detail. Your embroidery is beautiful! I’m getting back into hand embroidery after many years of sewing. It’s so relaxing. Thank you for sharing!
I want to draw my own proyects
Names with cursive letters… words..
What Can be useful for this
Thanks
Carmen
They also sell red pencils in embroidery section of craft or sewing stores for tracing. Trace onto white paper and then it creates an iron on transfer that you iron onto fabric. Works well if you are neat and sew over it and then you can wash entire piece by hand gently and it comes out. I’ve used a couple times. It’s not my personal favorite but it’s what I’ve had on hand. I’m going to try your frixxion pen method!
@Angela, I use these red pencils as well, works good for me.
Thank you so much for all your embroidery patterns. I have left you a nice comment on your youtube stem stitch video.
I used to stitch nursery patterns on my 2 sets grandchildren, years ago. They were very successful & quite unique as non of the other children had clothes with nursery rhymes. Because I haven’t don any embroidery for many years I had forgotten how to do some of them. Thks once again, i love your youtube demo.
Awww, I love nursery rhymes! I’m so glad you were able to use my tutorials to help you!
When I click the link for the Frixion pen it takes me to amazon, are they the multicoloured erasable ones? Or are they a specific fabric pen?
Thanks 🙂
It’s just the erasable gel pens. They aren’t made for fabric, but they disappear with heat.
What abt. Prick &pounce method?
I haven’t tried that one yet, but maybe I need to?
Those embroidery patterns are pretty and equally helpful
Thank you for info! very helpful